User Guide
- 1. Introduction
- 2. About
- 3. Quick start
- 4. Features
- 5. Command summary
- 6. FAQ
- 7. Glossary
- 8. Appendix
1. Introduction
TutorBuddy is a desktop application made for freelance tutors who give one-to-one tuition to efficiently manage their students’ contacts, provide a quick overview of scheduled tuition sessions, and handle monthly tuition fees calculation. TutorBuddy is also optimized for fast typing users to handle their day-to-day administrative responsibilities effectively.
2. About
This user guide provides documentation on the installation and usage of TutorBuddy. It also provides a comprehensive description of features available to you and includes a quick start section that helps you get started.
This guide uses the following features to make it easier for you to navigate around:
- Words that look like this are hyperlinks, where clicking on it will redirect the user to the related section.
- Words that look like
thisrefer to keywords used as part of commands or responses from TutorBuddy. - Words that look like this refer to keyboard keys that you can press.
Boxes with the ![]() icon contain additional useful information.
icon contain additional useful information.
Boxes with the ![]() icon contain additional tips and tricks to help you get the most out of TutorBuddy.
icon contain additional tips and tricks to help you get the most out of TutorBuddy.
3. Quick start
This section provides information on how to quickly start using TutorBuddy.
3.1 Installation
Here are a few steps to get you started on TutorBuddy:
-
Ensure you have Java 11 or above installed in your computer.
-
Download the latest version of TutorBuddy here.
-
Move the downloaded TutorBuddy to a folder of your choice. This will be known as the home folder of TutorBuddy.
-
Double-click the file to start the application. An application similar to the one below should appear in a few seconds.
3.2 Using TutorBuddy
This section offers an overview of the layout in TutorBuddy.
There are three main areas in TutorBuddy:
-
Utility area
-
Main viewing area
-
Result display box and command box
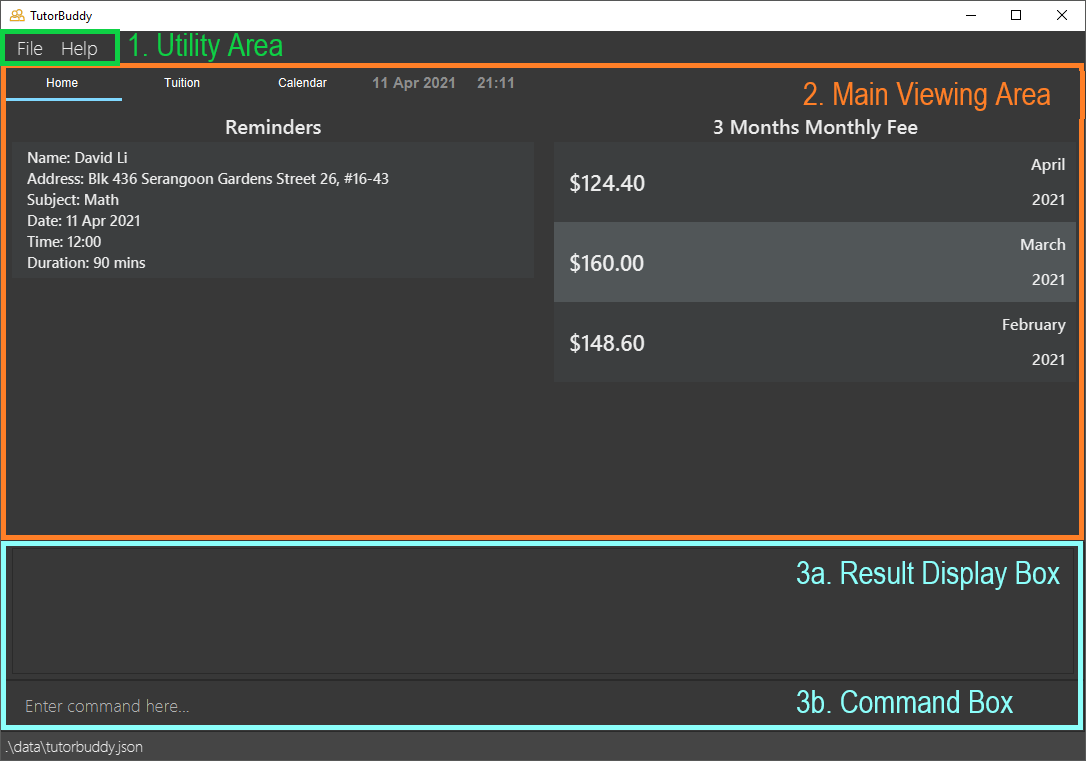
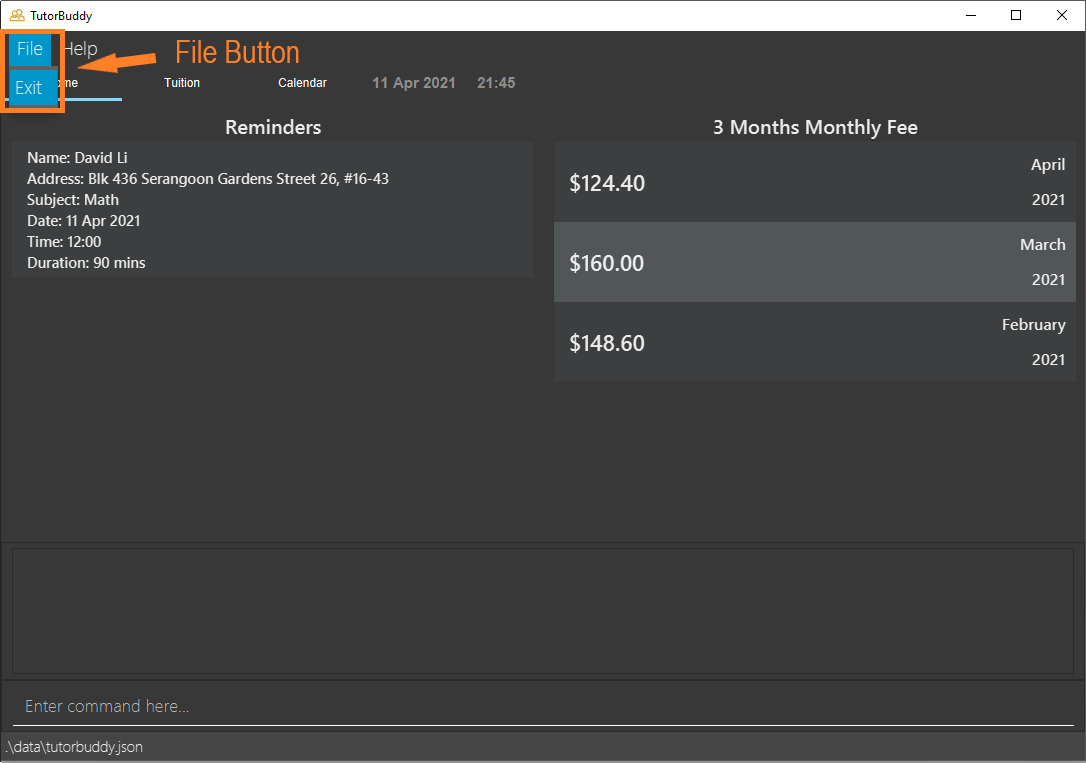
- The utility area consists of 2 tabs: File, and Help.
- The File tab consists of an exit button. To exit TutorBuddy, click on the exit button. Alternatively, use the
exitcommand to exit the application. - The Help tab consists of a help button. If you require any assistance, click on the help button, copy the link displayed and paste it into any web browser. Alternatively, press F1 to bring up the help window.
- The File tab consists of an exit button. To exit TutorBuddy, click on the exit button. Alternatively, use the
- The main viewing area consists of 3 tabs: Home, Tuition and Calendar.
- The Home tab gives tutors a quick overview of important matters. This includes their upcoming tuition lessons, as well as tuition fees receivable for the past 3 months.
- The Tuition tab allow tutors to view and manage their students and lessons.
- The Calendar tab allow tutors to have a weekly view of all sessions.
- The command box is the area for you to enter your commands. The result of each command will be shown in the result
display box, which is located directly above the command box. This area is always present in all tabs.
- Type a command in the command box and press Enter to execute it.
- Type a command in the command box and press Enter to execute it.
Using the sample data provided, here are some example commands you can try:
-
list: Lists all students and sessions. -
add_studentn/John Doe p/98765432 e/johnd@example.com a/John street, Block 123, #01-01 l/Sec2 g/95421323 r/Mother: Adds a student named John Doe to TutorBuddy. -
delete_student3: Deletes the 3rd student shown in the Student section. -
add_sessionn/John Doe d/2021-01-01 t/13:00 k/120 s/Biology f/80: Adds a single tuition session for John Doe happening on 2021-01-01 -
add_rec_sessionn/John Doe d/2021-01-01 t/18:00 k/120 s/Biology f/80 b/7 e/2021-01-15: Adds a 7-day recurring session for John Doe happening from 2021-01-01 to 2021-01-15 -
exit: Exits the application.
Refer to the Commands below for details of each command.
4. Features
4.1 View
TutorBuddy allows the user to take full control of managing their students and tuition sessions with the following 3 views:
- Home
- Tuition
- Calendar
![]() Clicking and focusing on the tab header allows the user to change tab quickly
using the arrow keys.
Clicking and focusing on the tab header allows the user to change tab quickly
using the arrow keys.
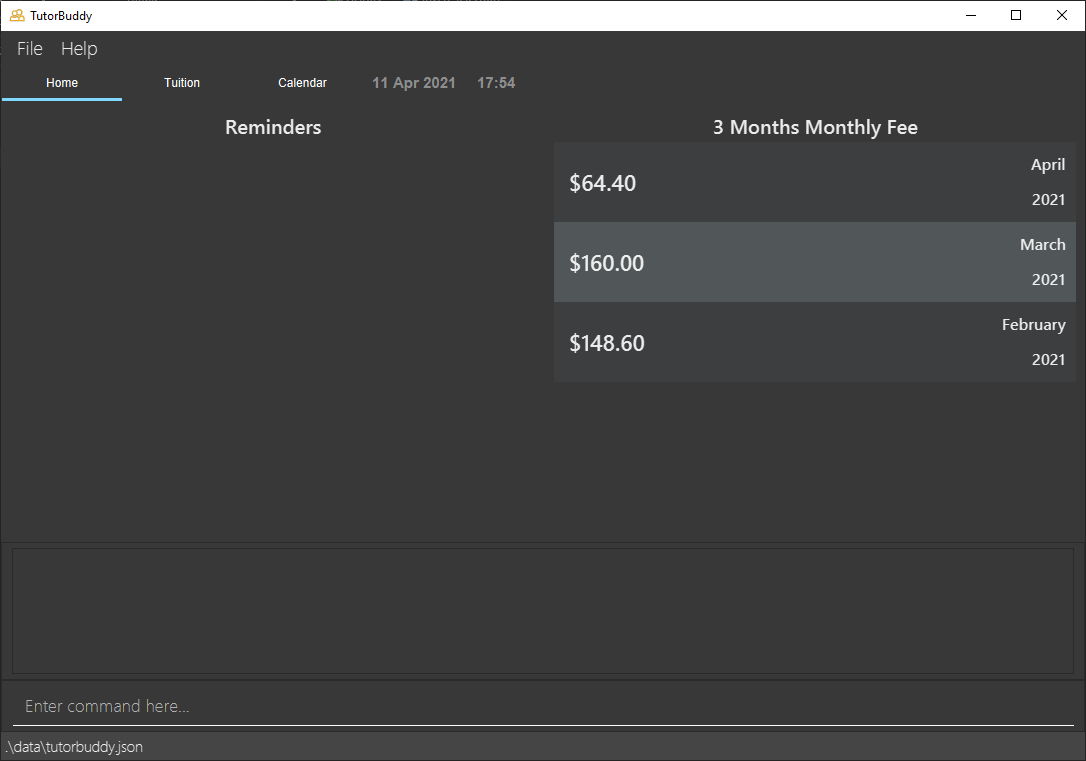
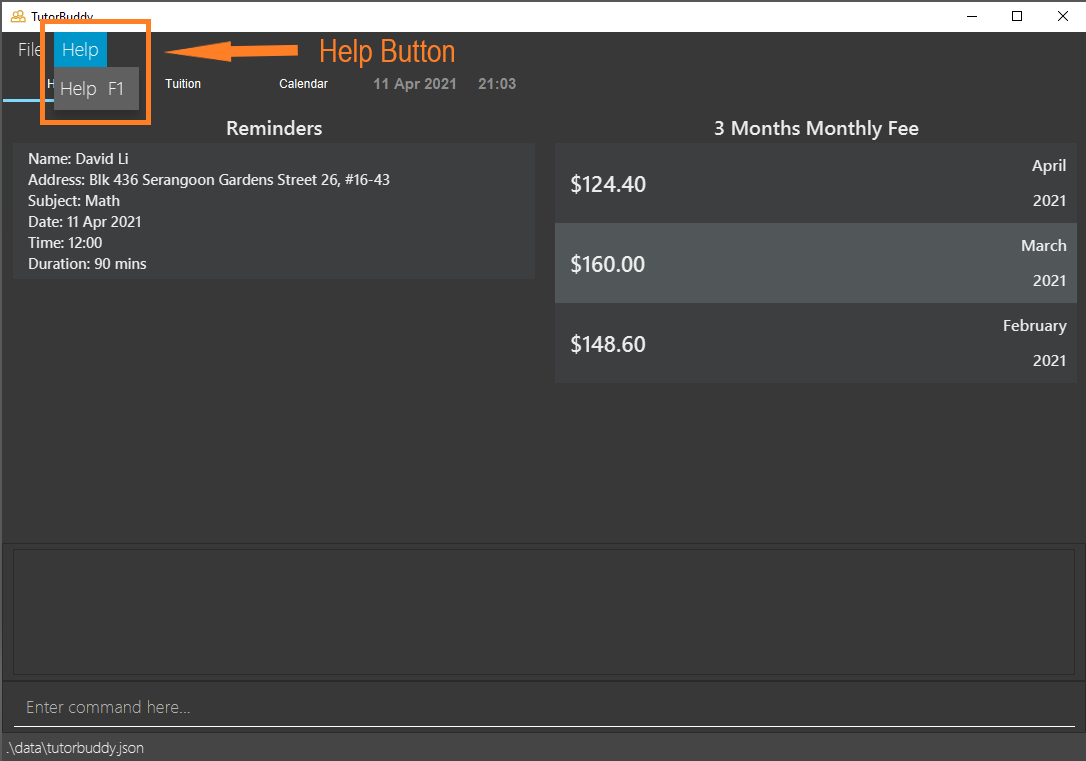
4.1.1 Home
The Home page is split into two views: Reminder and Monthly Fees.
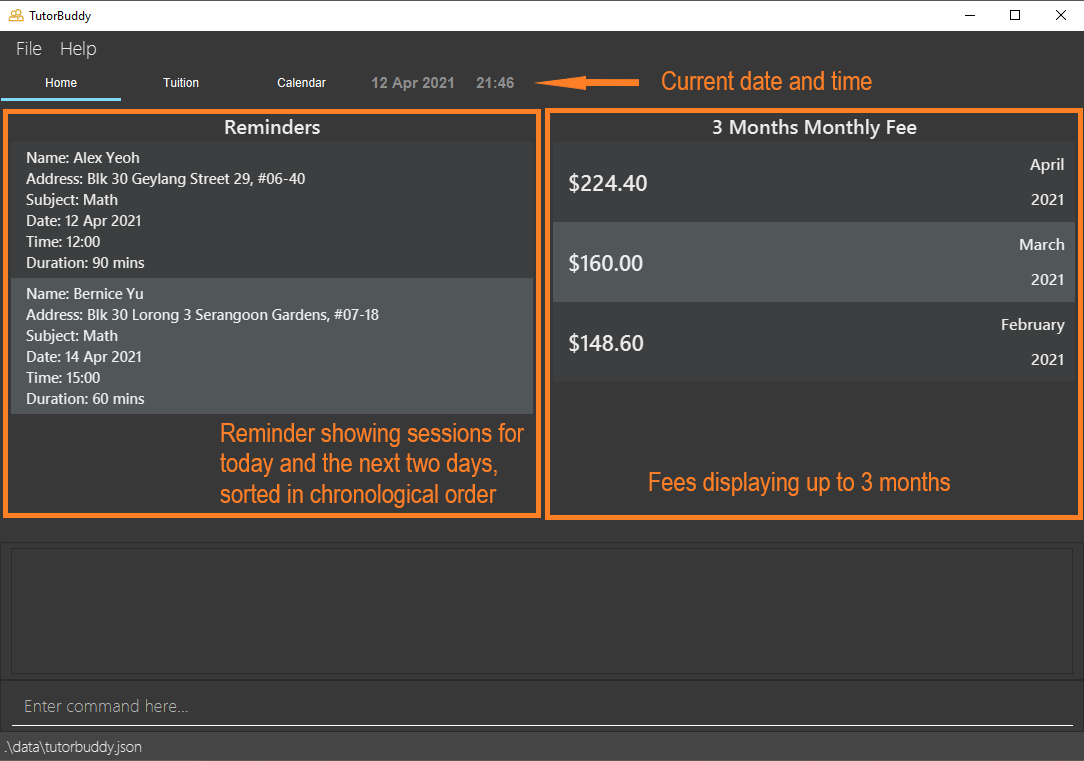
Reminder
The Reminder section displays upcoming tuition sessions for 3 consecutive days, starting today. The upcoming tuition sessions are sorted in chronological order here.
![]() If today is a Monday, then the Reminder section will display all sessions on this Monday,
Tuesday and Wednesday.
If today is a Monday, then the Reminder section will display all sessions on this Monday,
Tuesday and Wednesday.
3 Months Monthly Fee
The 3 Months Monthly Fees section displays tuition fees for the current month and the past two months.
![]() Note: The current month and past two months are calculated when the user first opens the application. No other months can be added to this section.
Note: The current month and past two months are calculated when the user first opens the application. No other months can be added to this section.
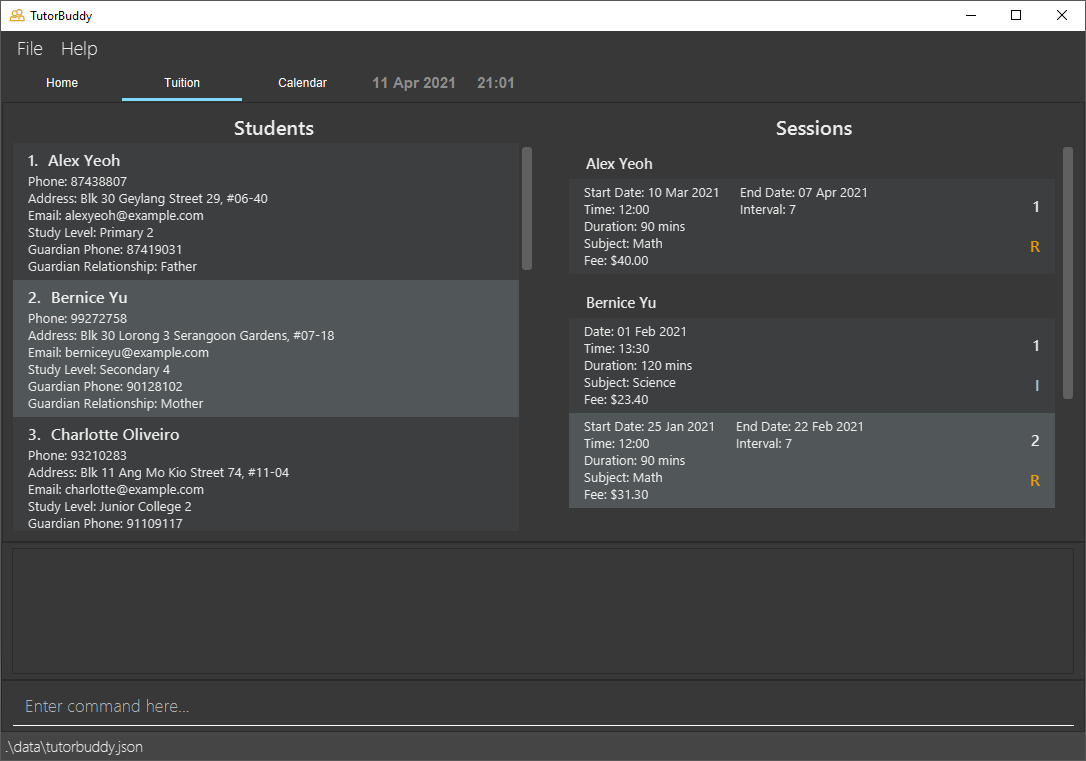
4.1.2 Tuition
The Tuition page is split into two views: Student and Session.
![]() This is the main tab for managing your students and sessions. Navigating to this tab before using commands such as
This is the main tab for managing your students and sessions. Navigating to this tab before using commands such as
add_student, find_student, add_session or delete_session allows the user
to see the reflected changes on the Student and Session list view.
Student
The Student section displays students in TutorBuddy.
Session
The Session section displays sessions corresponding to each student in TutorBuddy.
4.1.3 Calendar
The Calendar section provides a weekly view of all tuition sessions in TutorBuddy.
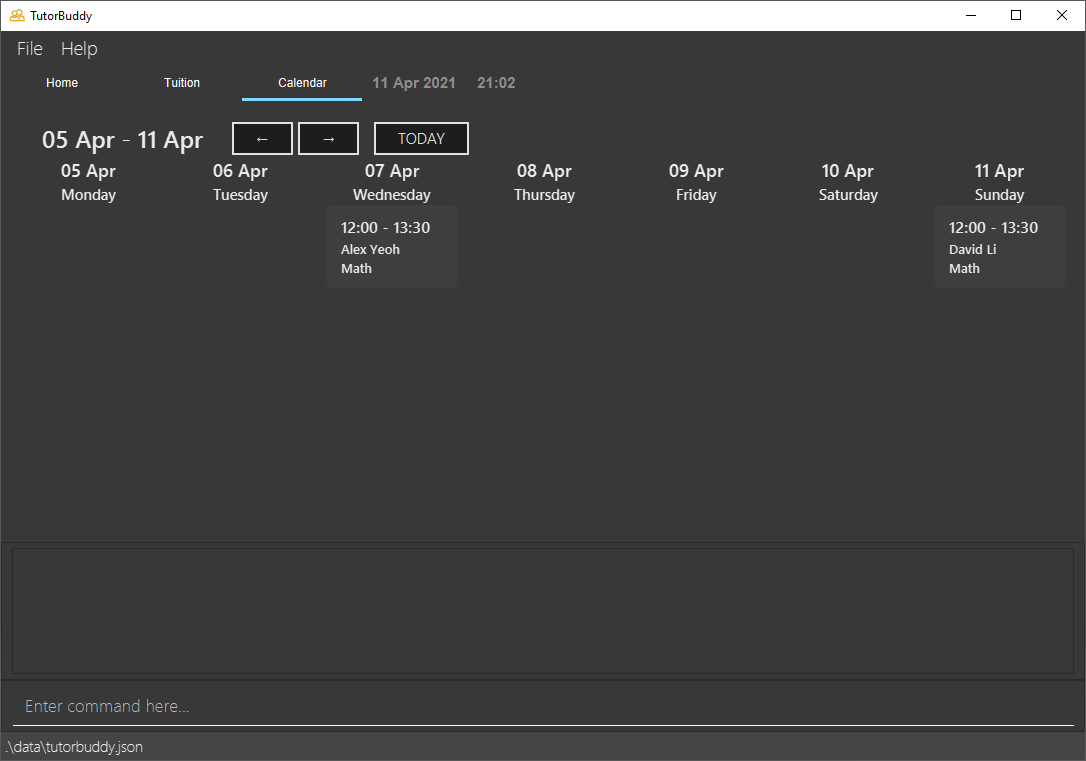 The left and right arrow allows you to view past and future tuition sessions.
Click the ‘Today’ button to be brought back to this week’s view.
The left and right arrow allows you to view past and future tuition sessions.
Click the ‘Today’ button to be brought back to this week’s view.
4.2 Commands
Commands are the main way you interact with TutorBuddy.
This section provides information about all commands that is available in TutorBuddy.
![]() All examples from this point onwards are based on the sample data unless otherwise stated.
All examples from this point onwards are based on the sample data unless otherwise stated.
Each example is run independently of the other examples.
The sample data can be found [here].
4.2.1 Command Format
![]() Notes about the command format:
Notes about the command format:
This section details the format of the commands available in TutorBuddy. We will adhere to the following:
-
Words in
UPPER_CASEare the parameters / information to be supplied by the user.
e.g. inadd_student n/NAME,NAMEis a parameter which can be used asadd n/John Doe. -
Items in square brackets are optional.
e.g.find_student KEYWORD [MORE_KEYWORDS]can be used asfind_student John Samuelor asfind_student John. -
Parameters can be in any order.
e.g. if the command specifiesn/NAME p/STUDENT_PHONE_NUMBER,p/STUDENT_PHONE_NUMBER n/NAMEis also acceptable. -
If a parameter is expected only once in the command but you specified it multiple times, only the last occurrence of the parameter will be taken.
e.g. if you specifyp/98765432 p/99999999, onlyp/99999999will be taken. -
Extra parameters for commands that do not take in parameters (such as
emails,help,exit,clearandlist) will be ignored.
e.g. if the command specifieshelp 123, it will be interpreted ashelp. -
Names are case-sensitive.
e.g.johnis considered different fromJohn.
However, note that infind_student, the search is case-insensitive. -
Names cannot be duplicates.
e.g. There cannot be 2 different students of the same nameJohn TanandJohn Tan. -
Indexes must be positive whole numbers 1, 2, 3, …
-
The
STUDENT_INDEXrefers to the index number shown in the displayed student list. -
The
SESSION_INDEXrefers to the index number shown in the displayed session list. -
Time must be input in the format,
hh:mm. e.g.13:00is allowed, but not1300. -
Date must be input in the format,
yyyy-mm-dd. e.g.2021-01-01is allowed, but not01-01-2021. -
Year must be between 1970 and 2037, both inclusive, in consideration of the 2038 problem e.g.
1969and2038is not allowed.
The following subsections will elaborate on the specific details of each TutorBuddy’s command.
4.2.2 General
Viewing help : help
Displays URL to TutorBuddy’s User Guide and a list of all commands and their usages.
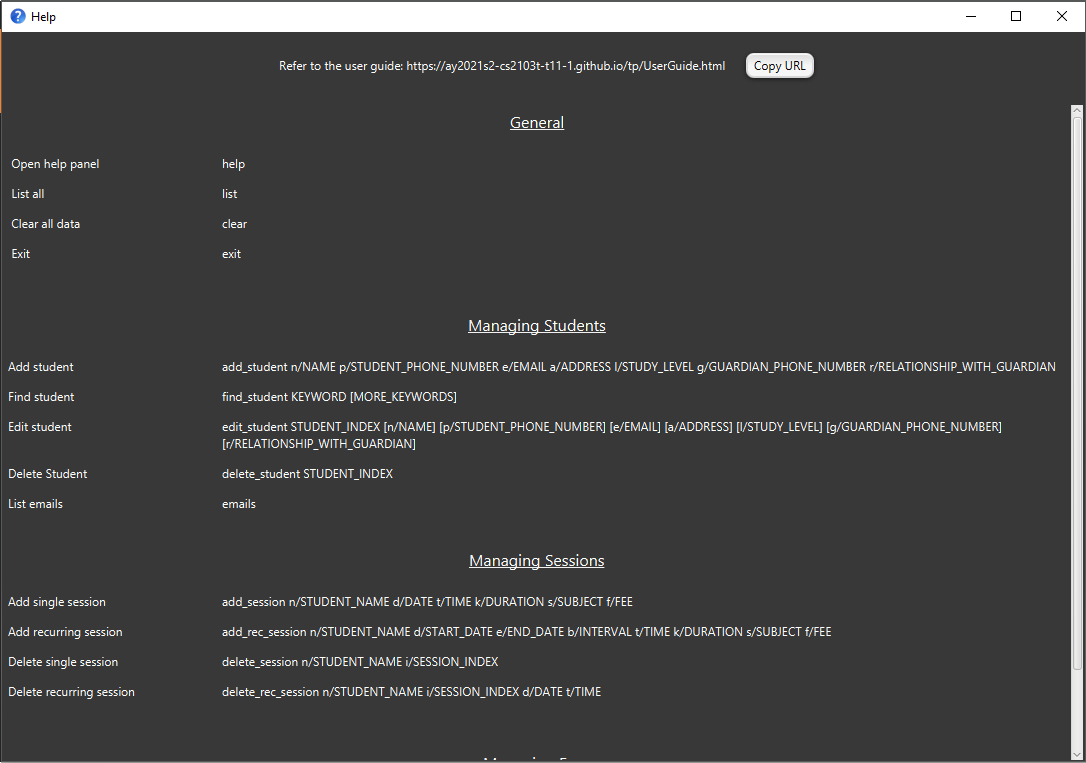
Format: help
To access the help page, do one of the following:
- type
helpin the command box - press F1
- click the ‘Help’ button on the top left and click on the dropdown
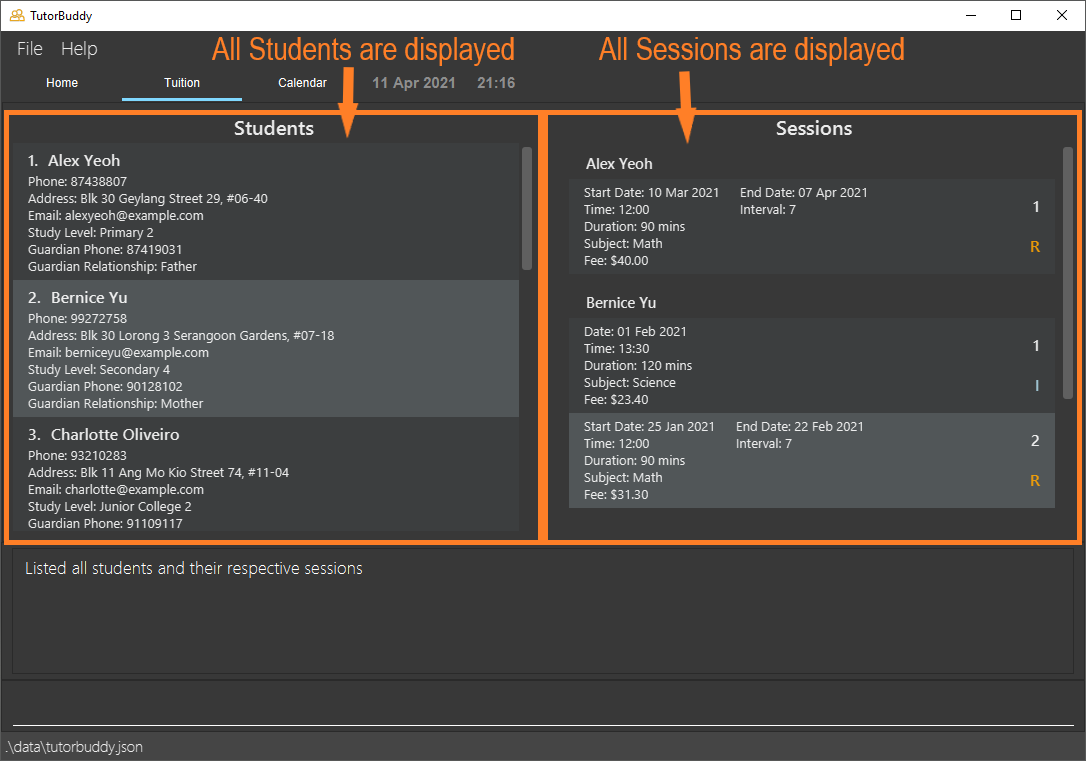
Listing all students and sessions: list
Displays list of all students and all sessions in TutorBuddy.
Format: list
Example:
- Type in the command
listand press Enter. - All students and sessions on their respective list view on the Tuition tab.
Clearing all data : clear
Clears all student and session data.
Run the
clear command after you have explored the application and wants to start working with TutorBuddy in a clean slate.
Format: clear
Example:
- Type in the command
clearand press Enter. - All data in TutorBuddy will be wiped clean.
Exit the program: exit
Exits the program
Format: exit
To exit the program, do one of the following:
- Type in the command
exitand press Enter - Press the ‘X’ at the top right of the TutorBuddy
- Click on the ‘File’ button on the top left and click on the dropdown
4.2.3 Managing Students
Adding a student: add_student
Adds a student to TutorBuddy with their respective guardian and study information.
Format: add_student n/NAME p/STUDENT_PHONE_NUMBER e/EMAIL a/ADDRESS l/STUDY_LEVEL g/GUARDIAN_PHONE_NUMBER r/RELATIONSHIP_WITH_GUARDIAN
![]()
STUDENT_PHONE_NUMBER, GUARDIAN_PHONE_NUMBER should be in Singapore’s phone formatting (i.e. starting with either 6, 8 or 9 and with 8 digits).
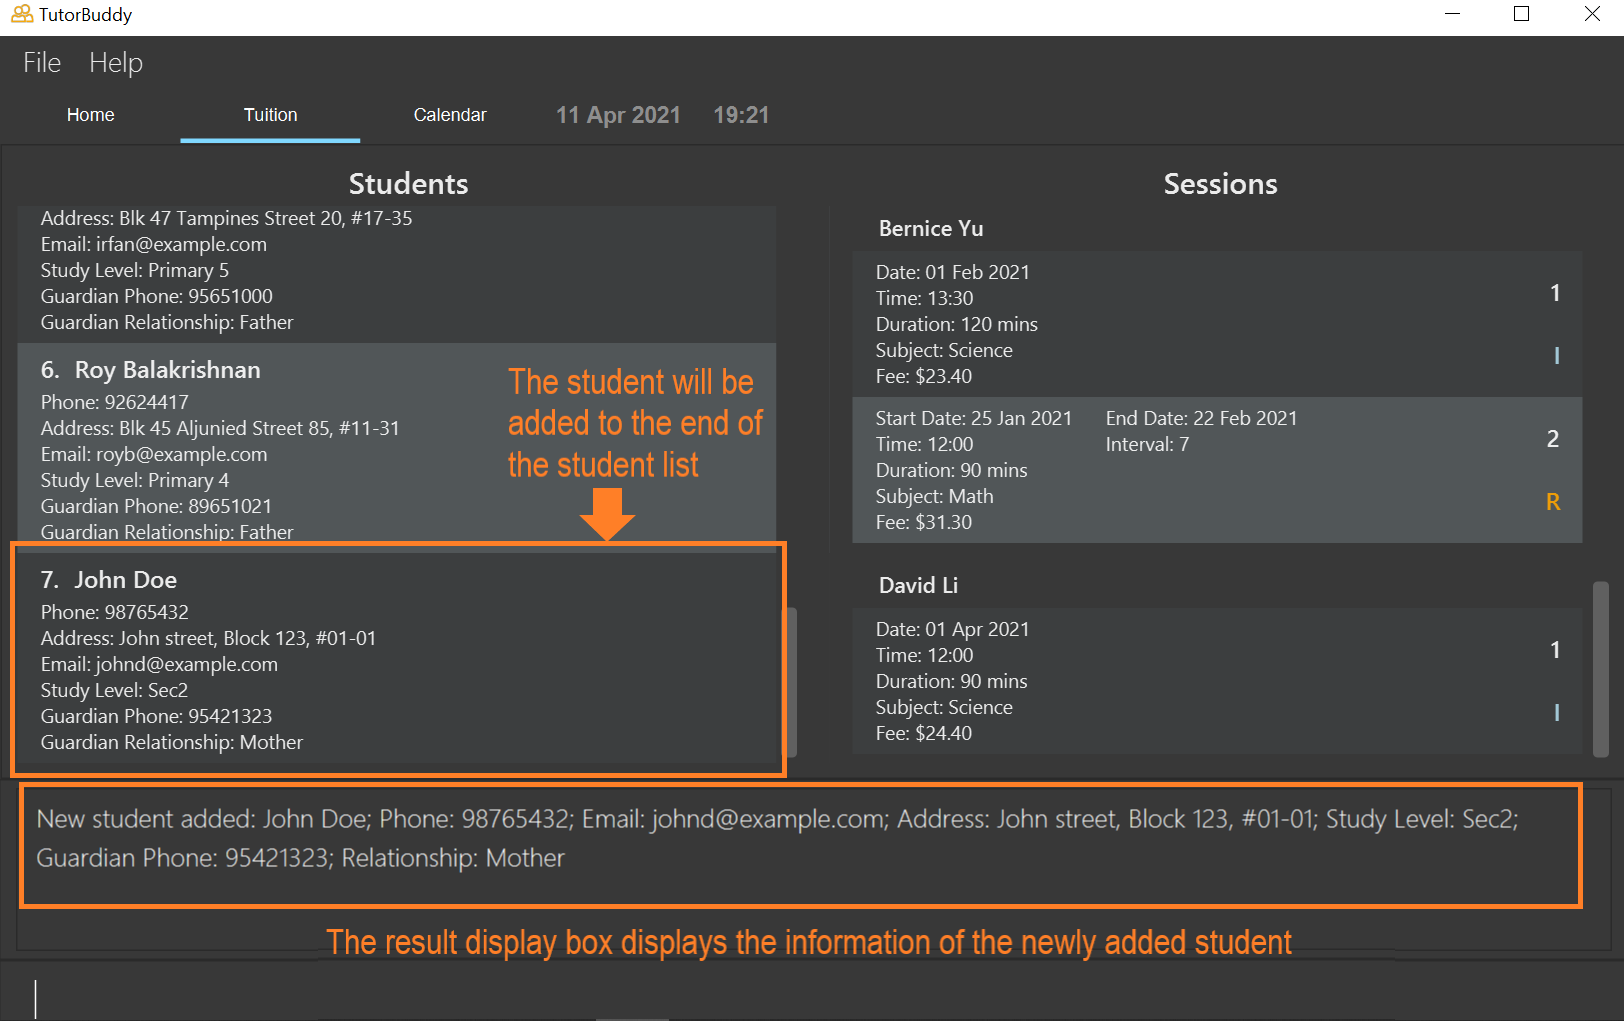
![]() TutorBuddy automatically shows the full list of students and sessions after a successful
TutorBuddy automatically shows the full list of students and sessions after a successful add_student command.
![]() TutorBuddy does not restrict the
TutorBuddy does not restrict the STUDY_LEVEL due to the vast number of education levels. The user
is free to input any education level.
Example: Any of the inputs here will be accepted. Sec 2, Secondary 2, JC 1, Poly Y2
![]() If you have different students of the same
If you have different students of the same NAME consider changing the name.
Example: Add a John Doe Bespectacled and a John Doe Unadorned
Example:
- You would like to add a new student, John Doe to TutorBuddy.
- Type in
add_student n/John Doe p/98765432 e/johnd@example.com a/John street, Block 123, #01-01 l/Sec2 g/95421323 r/Motherwhich includes all the essential information the application needs from the student and press Enter.
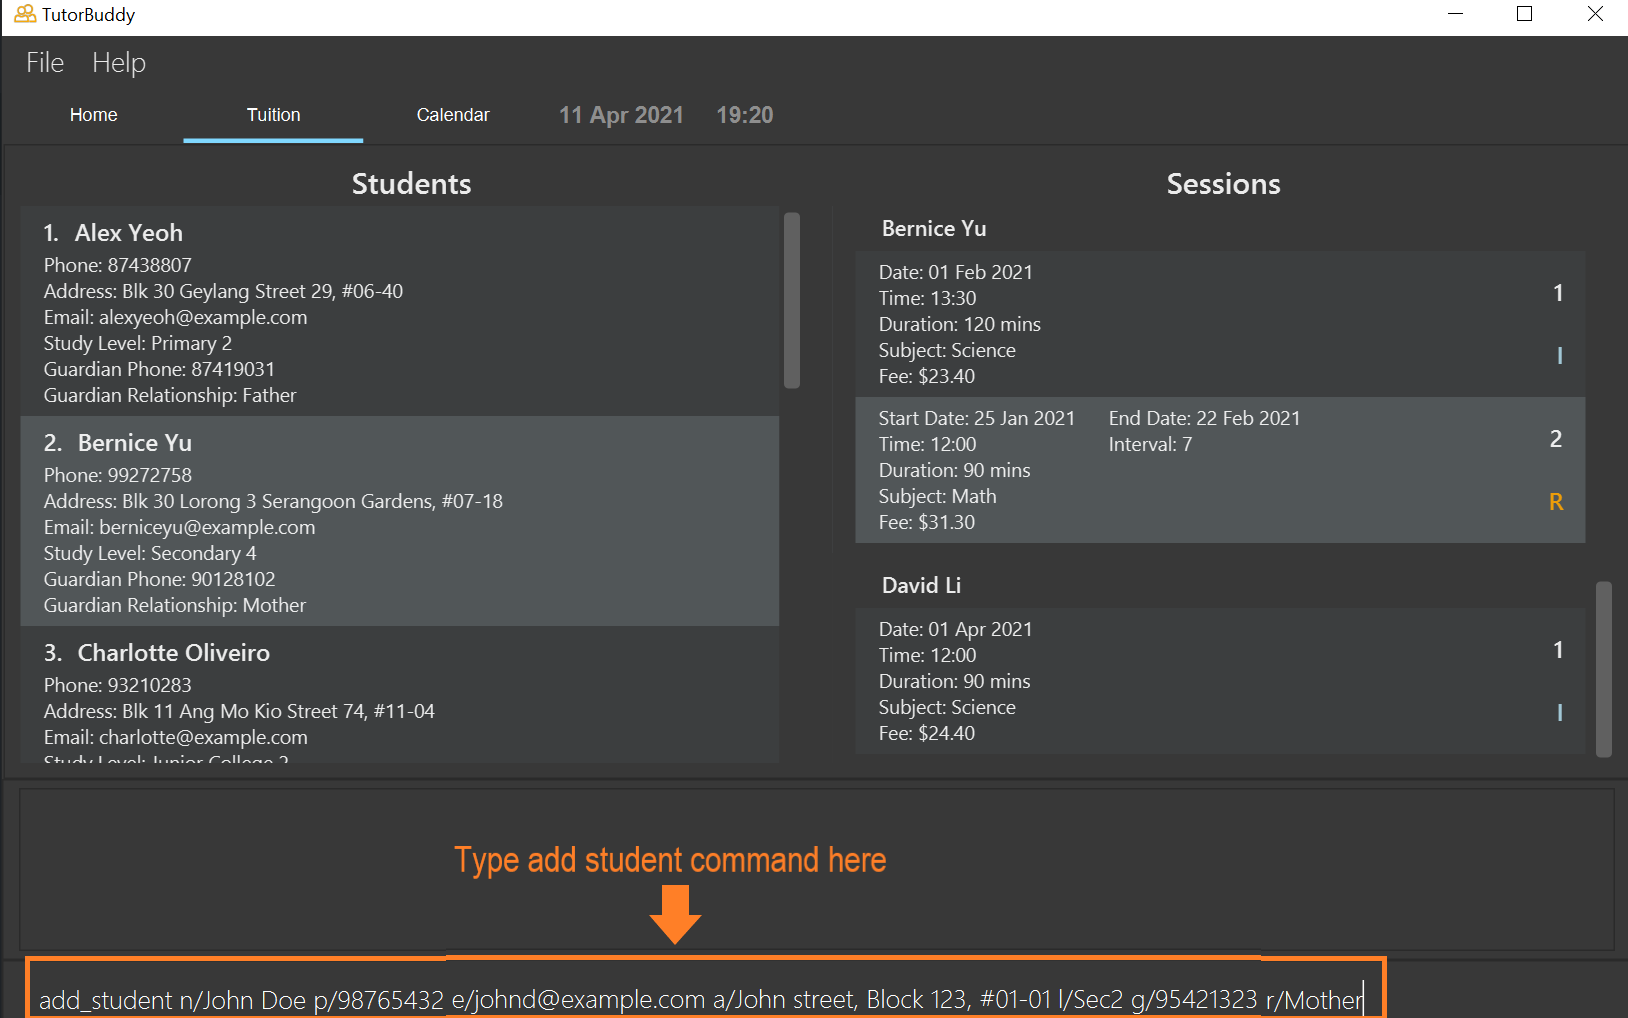
- Scrolling down to the end of the student list, you will see that John Doe has been added to TutorBuddy.
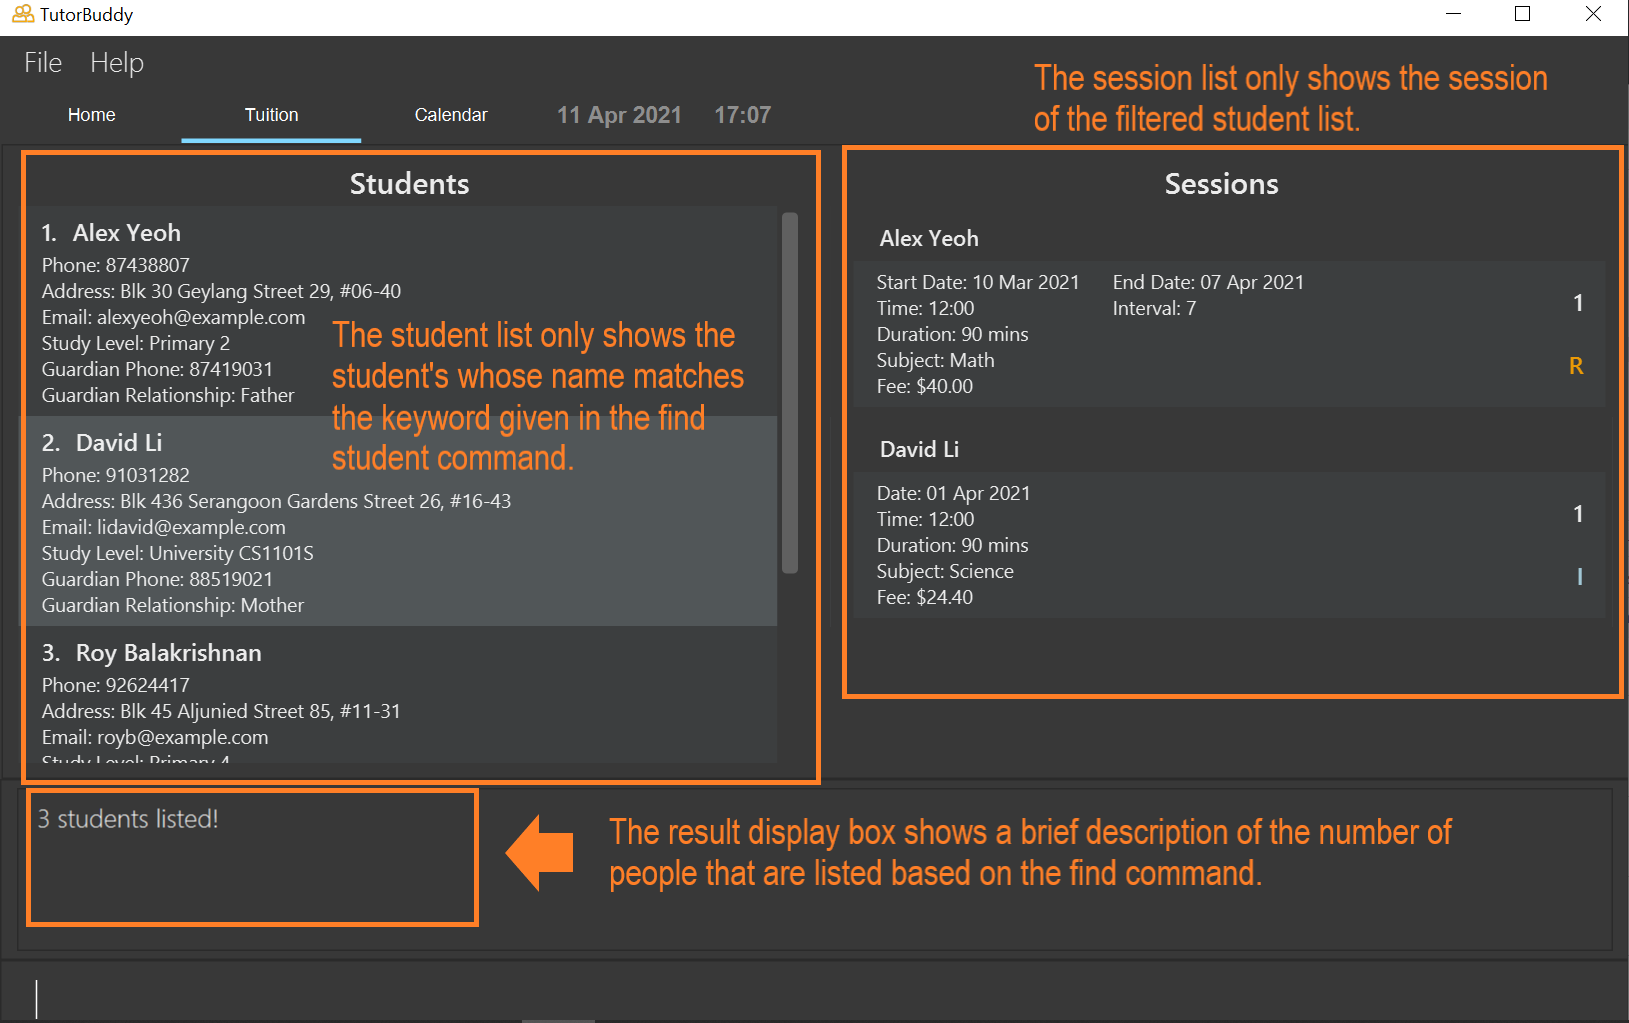
Locating student by name: find_student
Filters the student and session list to only include student(s), and their respective session(s) whose student name contains any of the given keywords.
Format: find_student KEYWORD [MORE_KEYWORDS]
- The search will be case-insensitive. e.g. searching
johnwill matchJOHN - Only the name of students can be searched
- The order of the keywords does not matter. e.g.
John Doewill matchDoe John - Only full words will be matched e.g.
Dowill not matchDoe - Students with name matching at least one keyword will be returned (i.e.
ORsearch) e.g.John Doewill returnJohn Tan,Peter Doe
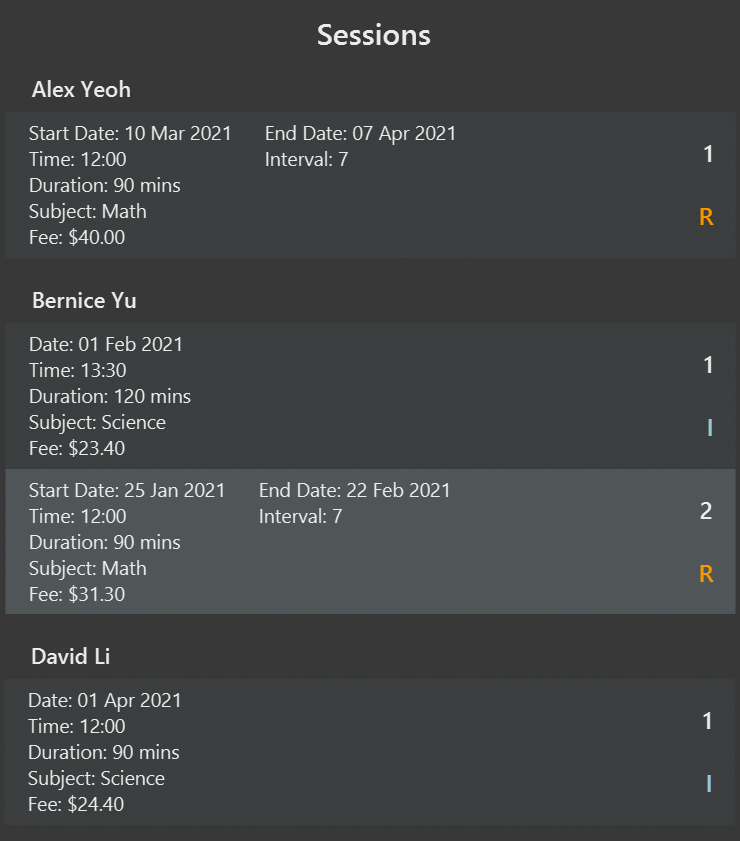
Example 1:
| # | Student Name |
|---|---|
| 1 | John Lee |
| 2 | Johnz Tan |
| 3 | Jon Koh |
| 4 | Samuel Lee |
Figure 1: Current State of Student List
Example command usages from the current student list shown in Figure 1:
-
find_student Johnreturns “John Lee” -
find_student Samreturns nothing -
find_student Leereturns “John Lee” and “Samuel Lee” -
find_student Johnz Leereturns “John Lee”, “Johnz Tan” and “Samuel Lee”
Example 2:
-
You want to find students whose name contains Alex, David and Roy.
-
Type
find_student alex david roy(Note: keywords are case-insensitive) and press Enter.
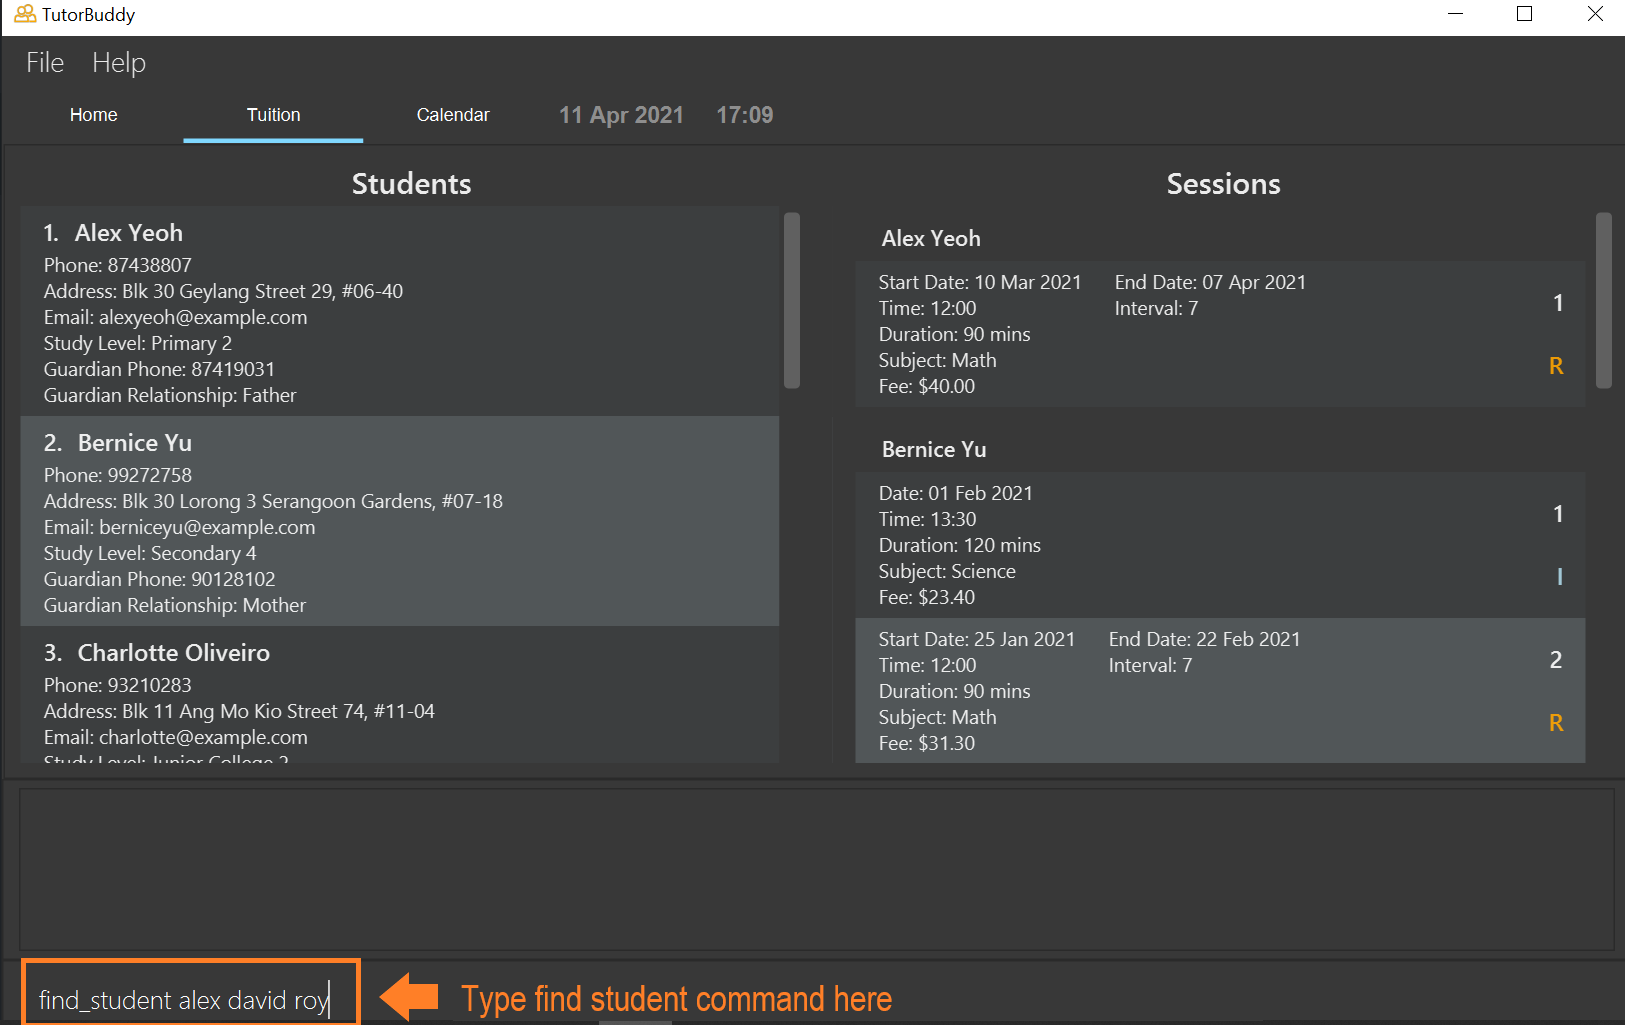
- The student and session list will be filtered and only contains students and sessions of students whose name contains the keywords specified.
Editing a student: edit_student
Edits an existing student’s detail(s) in TutorBuddy.
Format: edit_student STUDENT_INDEX [n/NAME] [p/STUDENT_PHONE_NUMBER] [e/EMAIL] [a/ADDRESS] [l/STUDY_LEVEL] [g/GUARDIAN_PHONE_NUMBER] [r/RELATIONSHIP_WITH_GUARDIAN]
-
STUDENT_PHONE_NUMBERandGUARDIAN_PHONE_NUMBERshould be in Singapore’s phone formatting (i.e. starting with either 6, 8 or 9 with 8 digits)
Example:
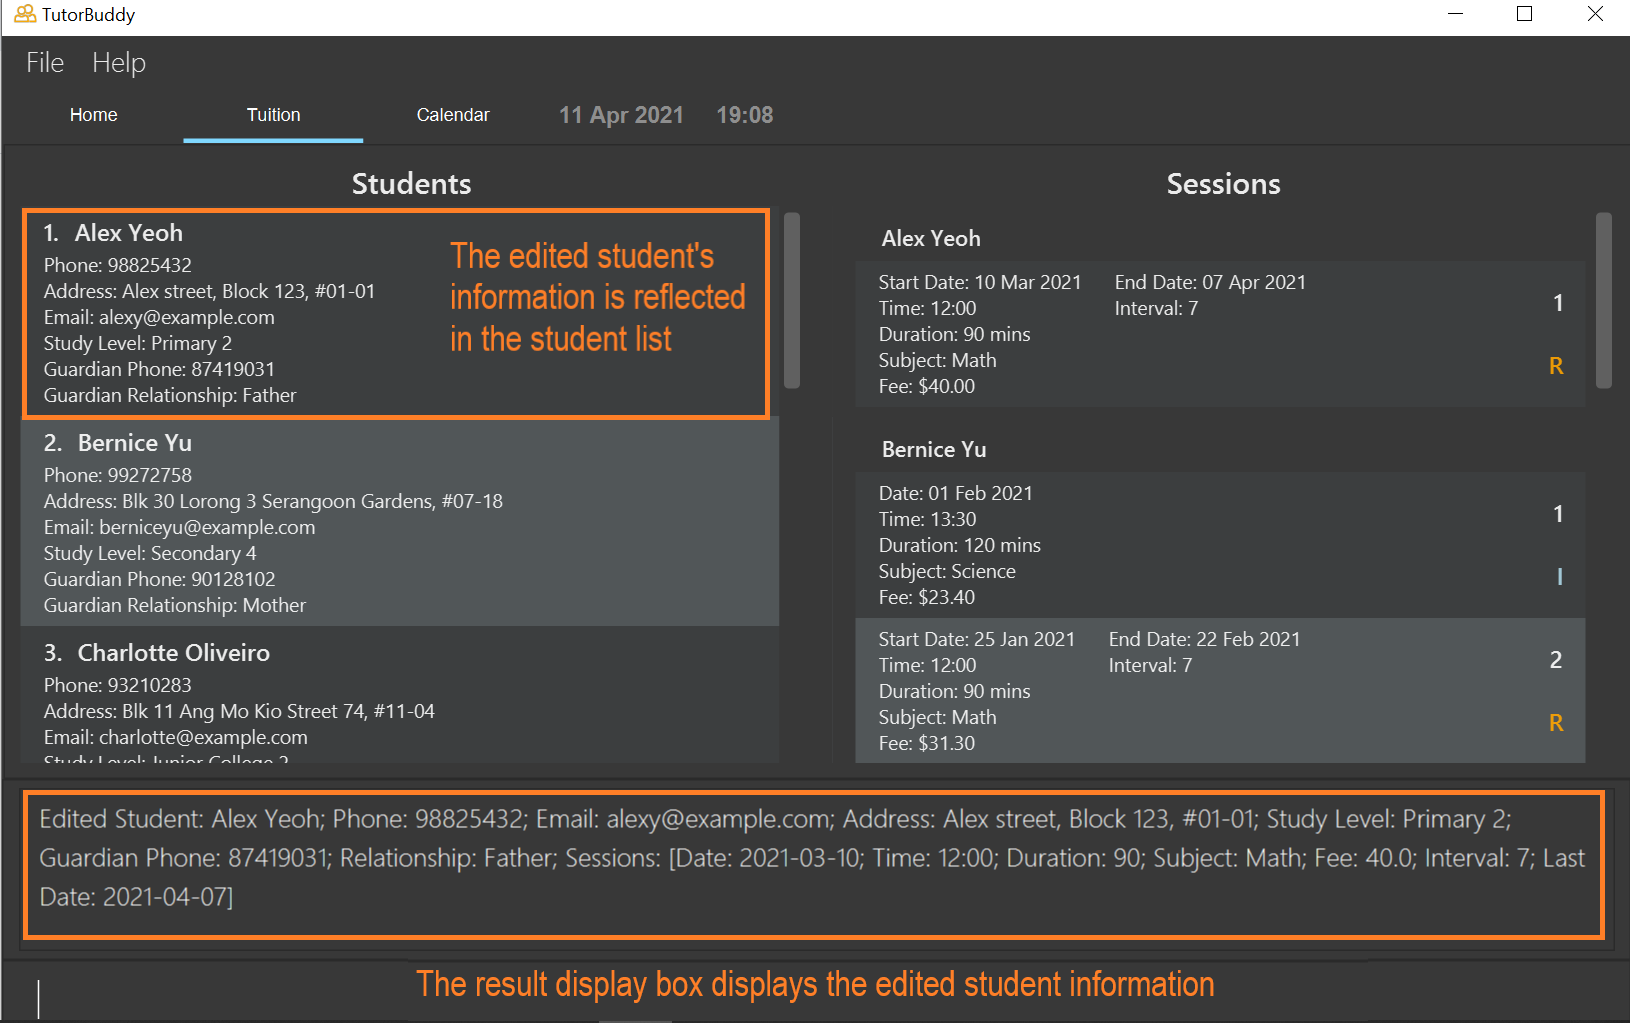
- You would like to edit Alex Yeoh phone number, email address and address as they are wrong.
- Type
edit_student 1 p/98825432 e/alexy@example.com a/Alex street, Block 123, #01-01and press Enter. (This edits the student Alex Yeoh’sSTUDENT_PHONE_NUMBER,EMAIL, andADDRESSwhich is at index 1)
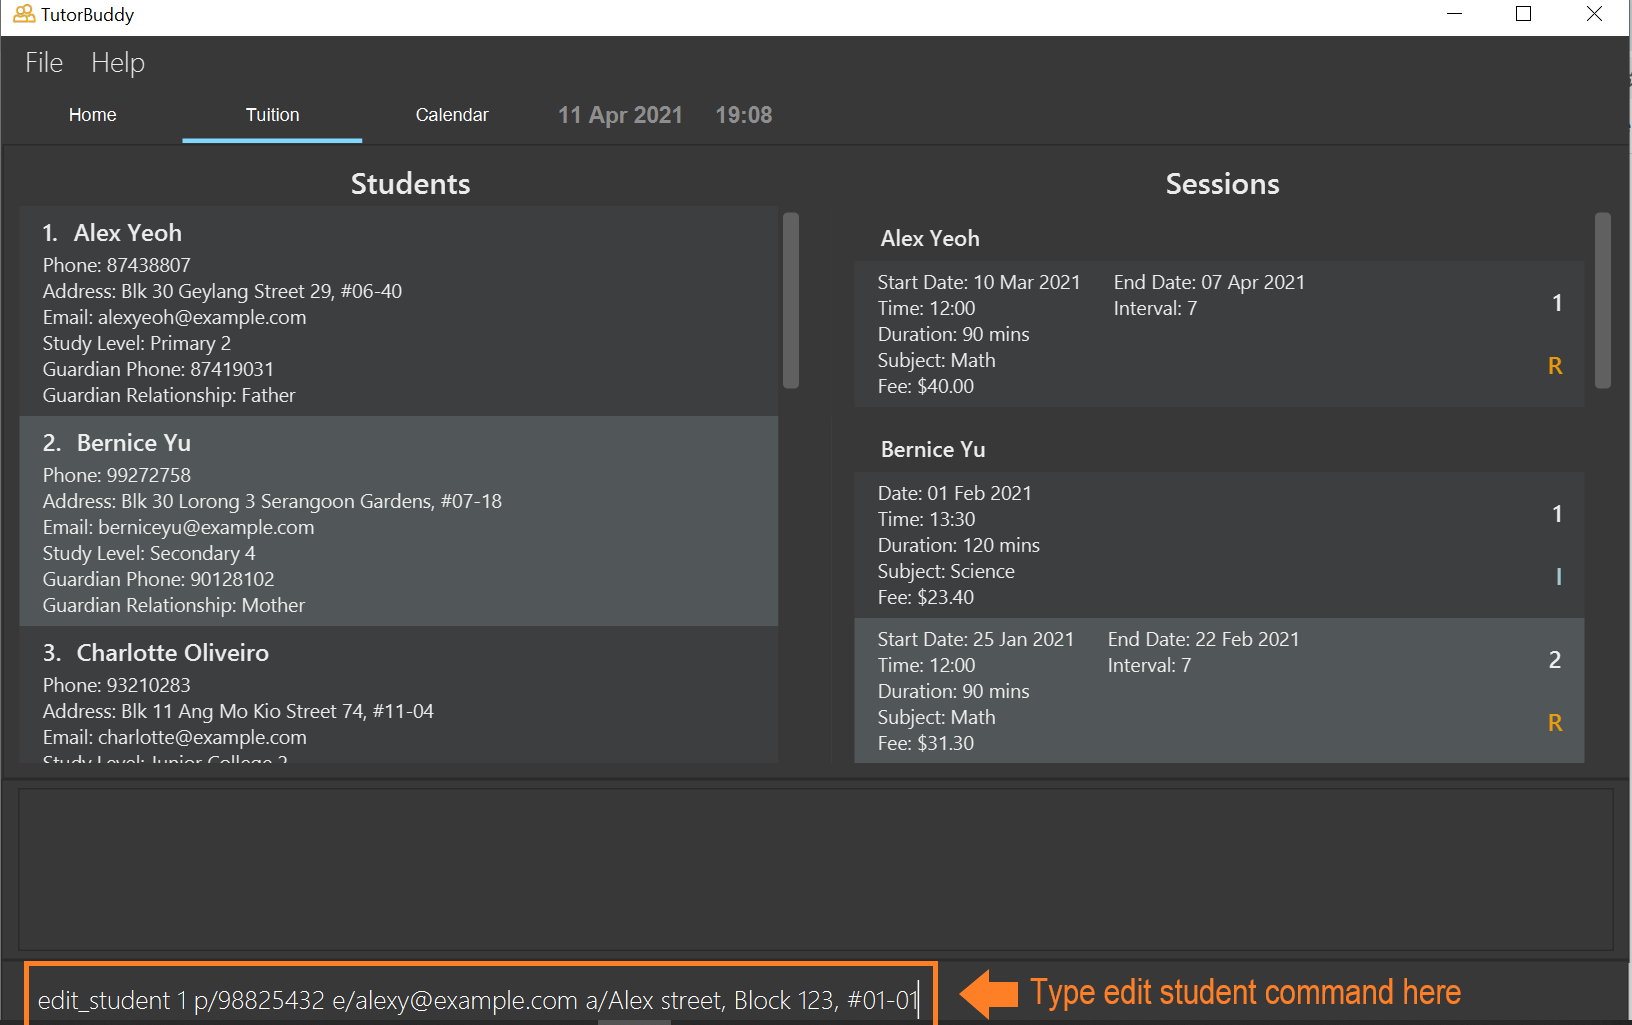
- The edited student information will be reflected in the student list.
find_student command to filter the list of students you want.The
STUDENT_INDEX will be based on the current / filtered list.(E.g. If John Doe is the 500th student, instead of
edit_student 500 [...], you can use find_student John Doe and
edit_student 1 [...] if the particular John Doe you wish to edit is the 1st in the list)
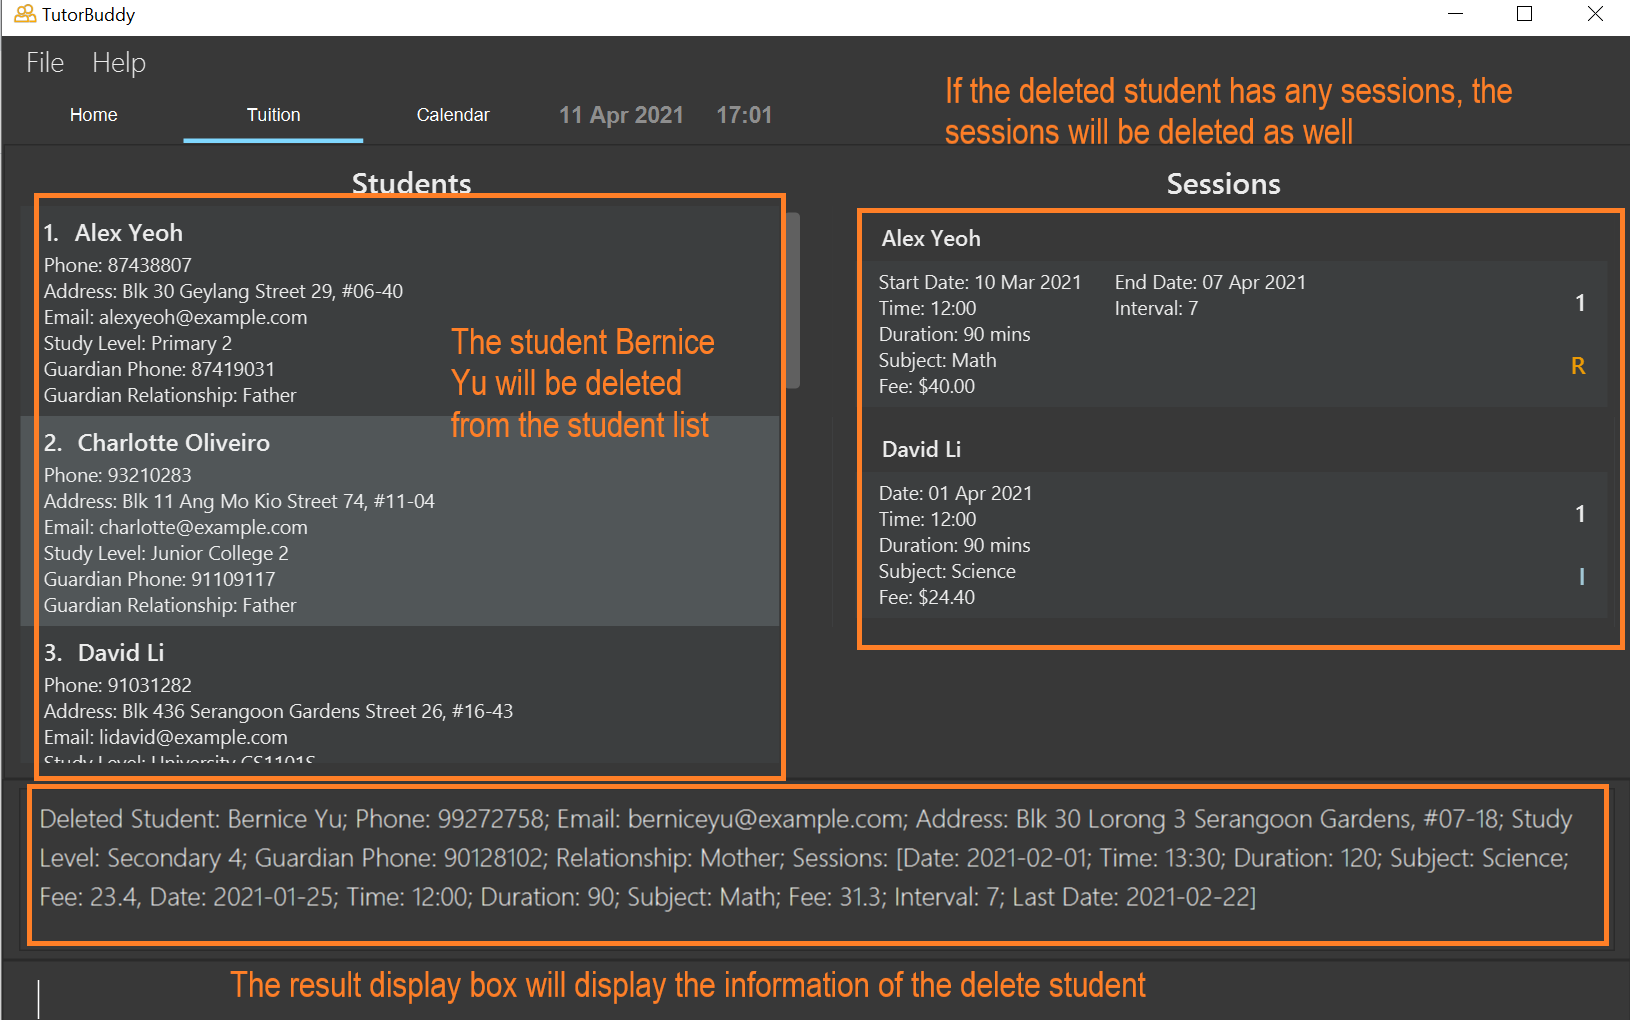
Deleting a student: delete_student
Deletes the specified student from TutorBuddy.
Format: delete_student STUDENT_INDEX
Example:
- You would like to delete the 2nd student based on the current list of students.
- Type
delete_student 2and press Enter.
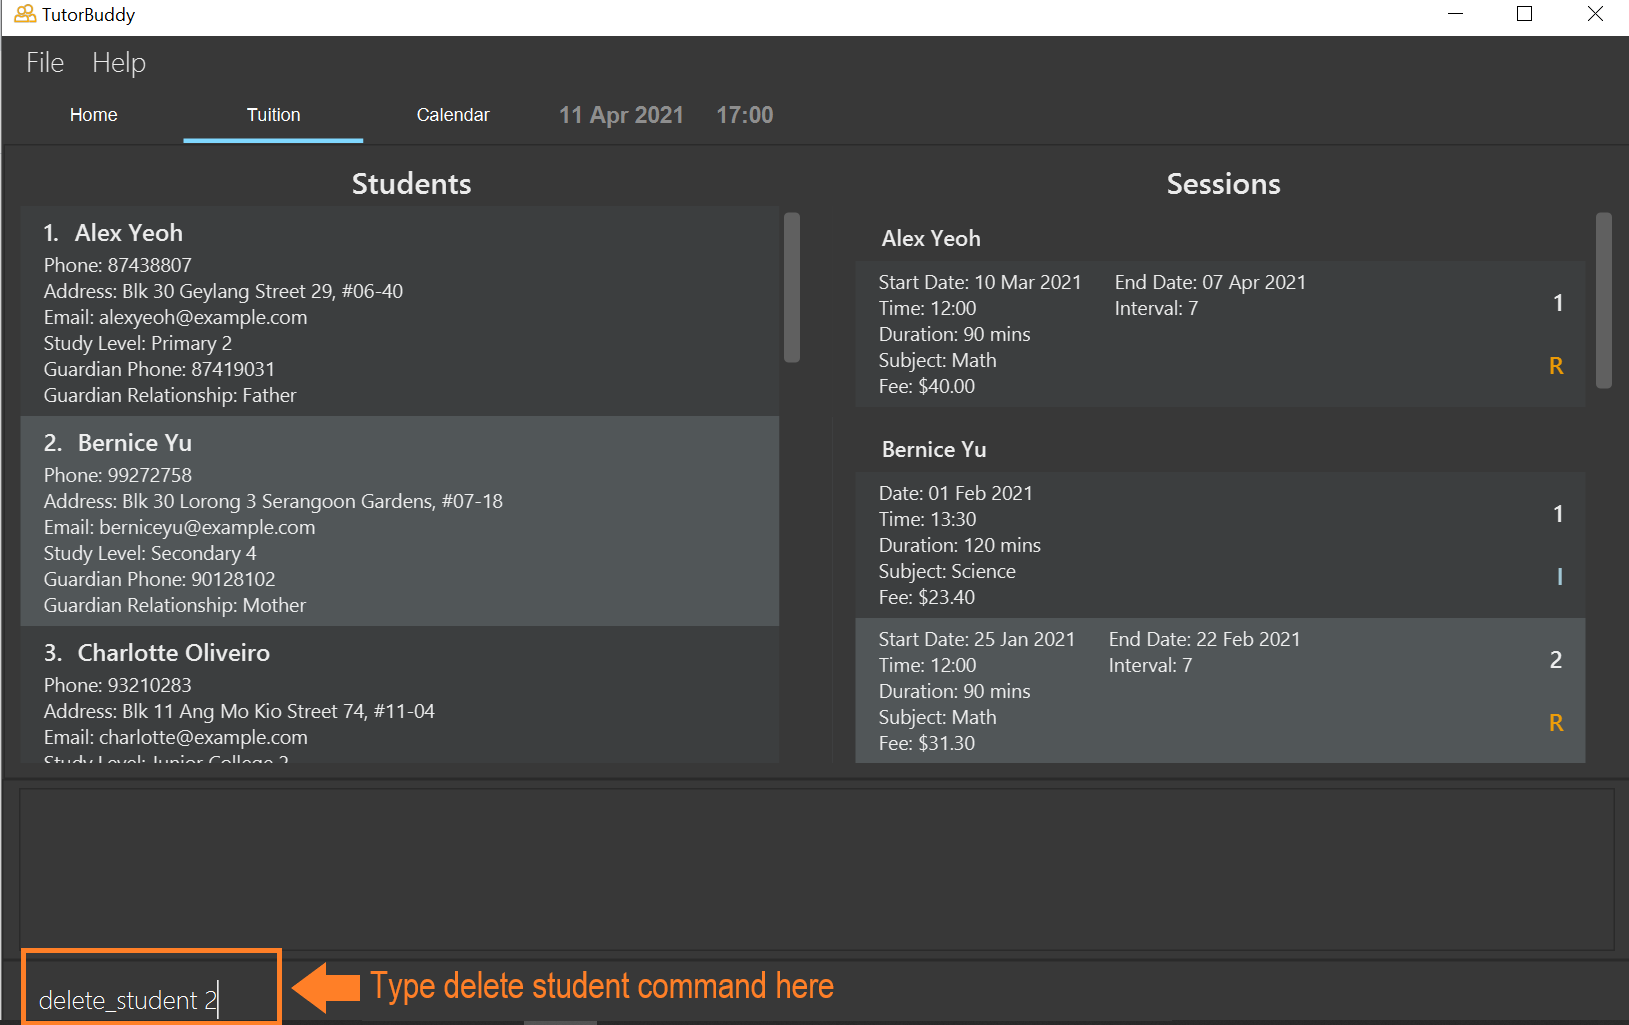
- The 2nd student in the list (Bernice Yu) and her associated sessions will be deleted.
edit_student, you can also use find_student command to filter the list of students you want.The
STUDENT_INDEX will be based on the current / filtered list.(E.g. If John Doe is the 500th student, instead of
delete_student 500, you can use find_student John Doe and
delete_student 1 if the particular John Doe you wish to delete is the 1st in the list)
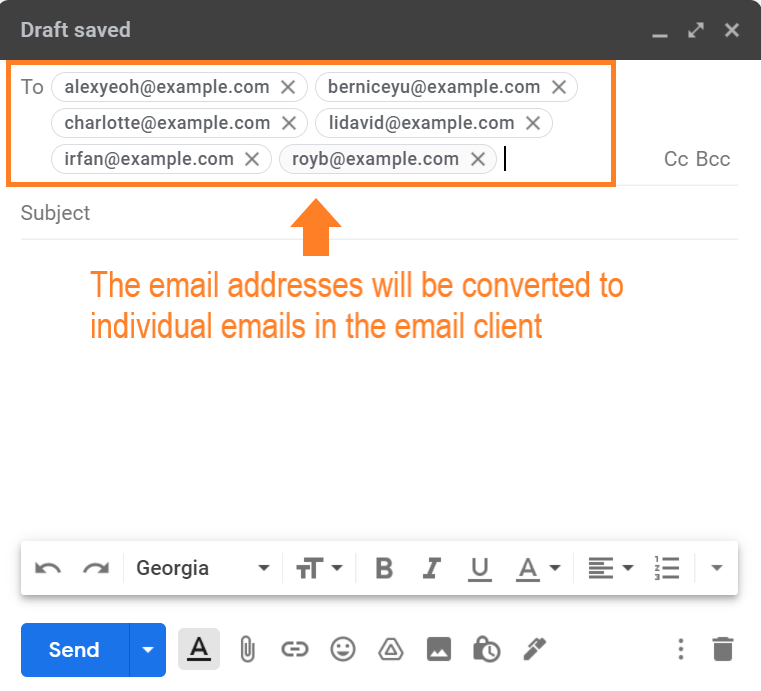
Listing students’ emails based on current list: emails
As a user, you might want to quickly get all the email address of your students and send them a mass email.
This feature displays a concatenated text of students’ emails based on current list, separated by ; which can be copied to their respective email client (E.g. Gmail) for mass sending of emails to students.
Format: emails
Example:
-
You want to send a mass email to all of your students.
-
Type
emailsand press Enter.
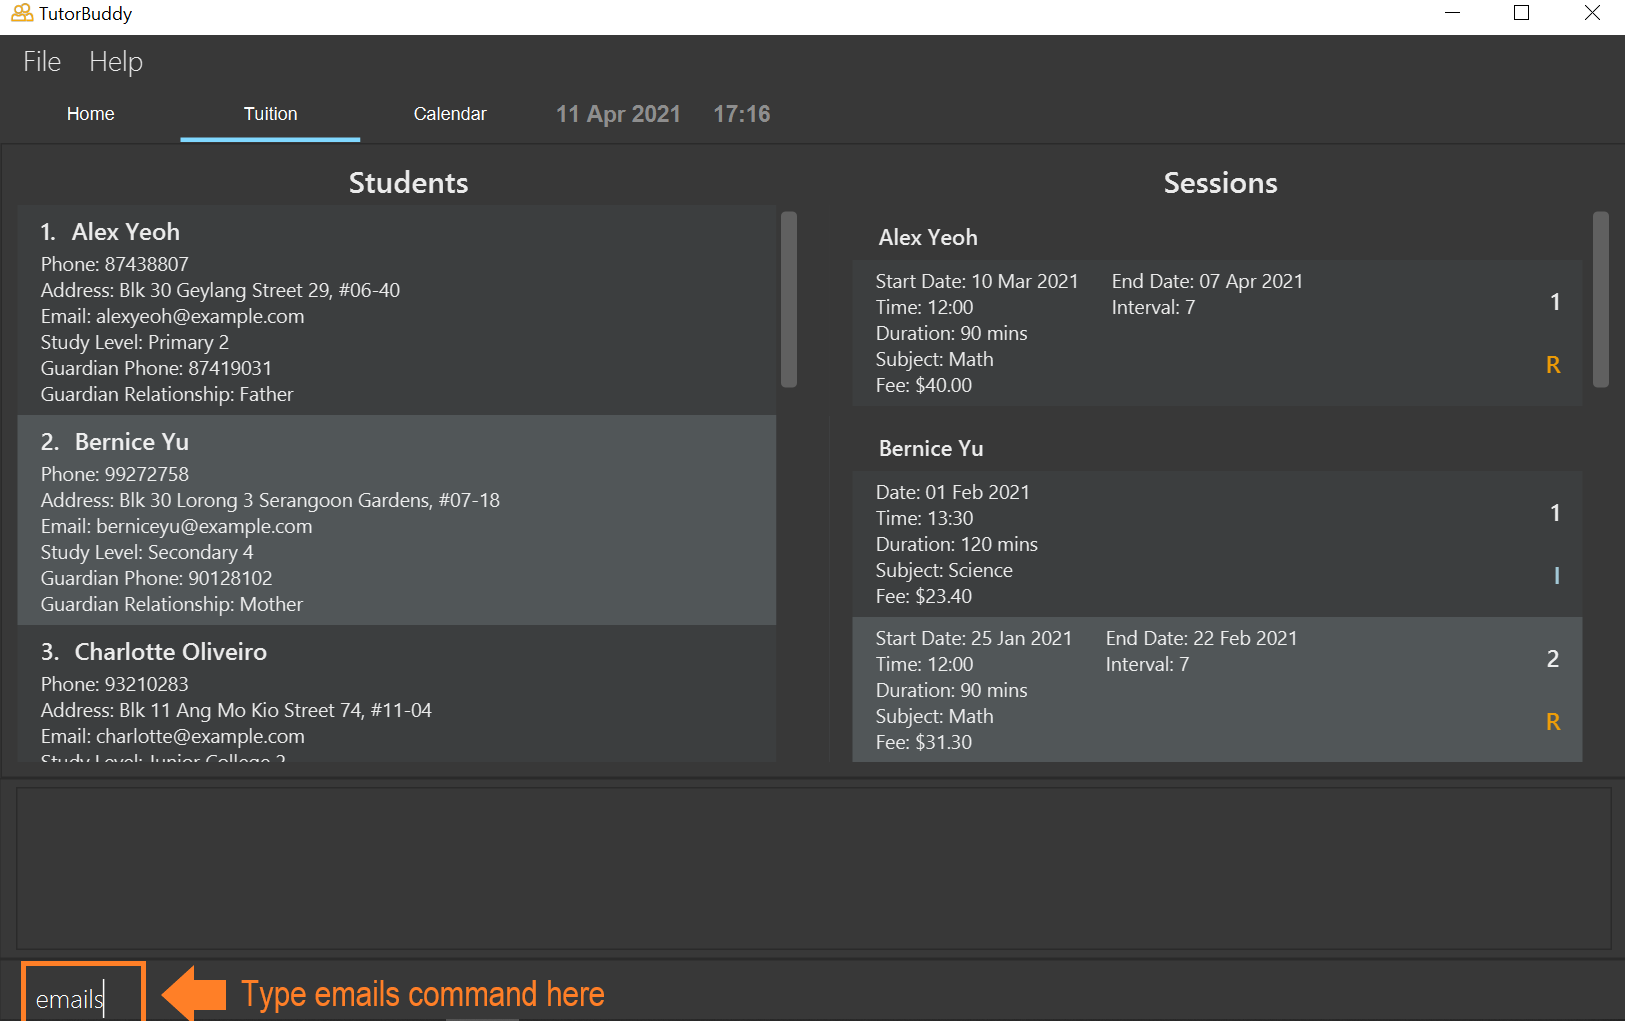
- The concatenated text of all the students' emails will be displayed.

- The user can copy the values in the result display box to the "To" field of any email client that they have (E.g. Gmail).
edit_student, you can also use find_student command after step 1 to filter the list of students you want.The email addresses displayed will be based on the current list.
(E.g. If you only want the the email addresses of
Alex Yeoh, David Li and Roy Balakrishnan from the sample data,
you can use find_student Alex David Roy and emails
to get the concatenated text of the 3 students’ email addresses.)
4.2.4 Managing Sessions
Please note that the following session commands can only be used after you have at least 1 student in TutorBuddy. Click here if you want to find out more on how to add your first student.
![]() Note that the examples in this section are done consecutively with an existing student, John Doe, in TutorBuddy.
Note that the examples in this section are done consecutively with an existing student, John Doe, in TutorBuddy.
Adding a single tuition session: add_session
Adds a single tuition session to TutorBuddy.
Format: add_session n/STUDENT_NAME d/DATE t/TIME k/DURATION s/SUBJECT f/FEE
-
STUDENT_NAMEshould match the exact student’s name in TutorBuddy -
DATEshould be the date of the session inyyyy-mm-ddformat -
DURATIONshould be in minutes -
FEEshould be the total tuition fee for 1 session of the given duration- TutorBuddy only accepts
FEEwithin an acceptable range of values between 0 and 999999.99 (both inclusive) as we do not expect a single session to cost more than $999,999.99 or more. -
FEEonly allows values up to 2 decimal points only
- TutorBuddy only accepts
![]() Note that the [Time given in
Note that the [Time given in DATE + DURATION] should not exceed 23:59H of the same day.
This is done as we do not except tutors to teach lessons beyond the day itself.
Example:
- You would like to add a new session for John Doe on the date 01 Jan 2021 at 18:00 where you will teach Biology for 120 minutes and charge a fee of $80.
- Type in
add_session n/John Doe d/2021-01-01 t/18:00 k/120 s/Biology f/80and press Enter to add the session information into TutorBuddy.
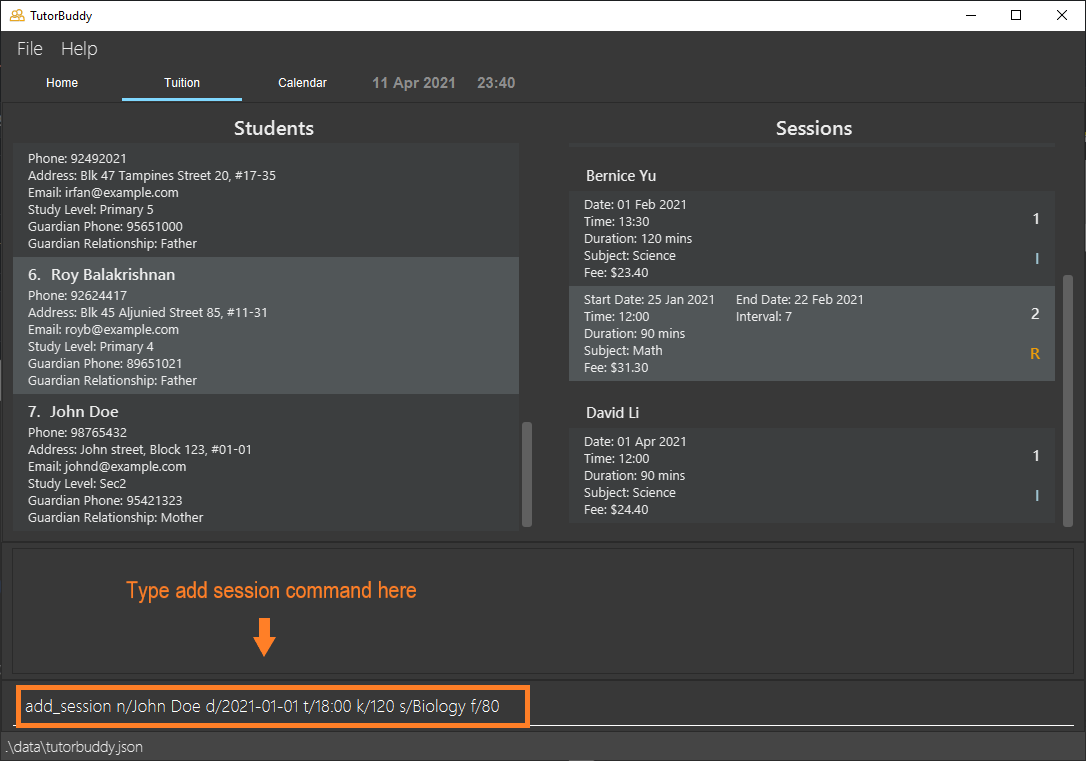
- You will now see that a new session is added in the session list under John Doe and is marked with a light blue letter "I" to indicate an individual session.

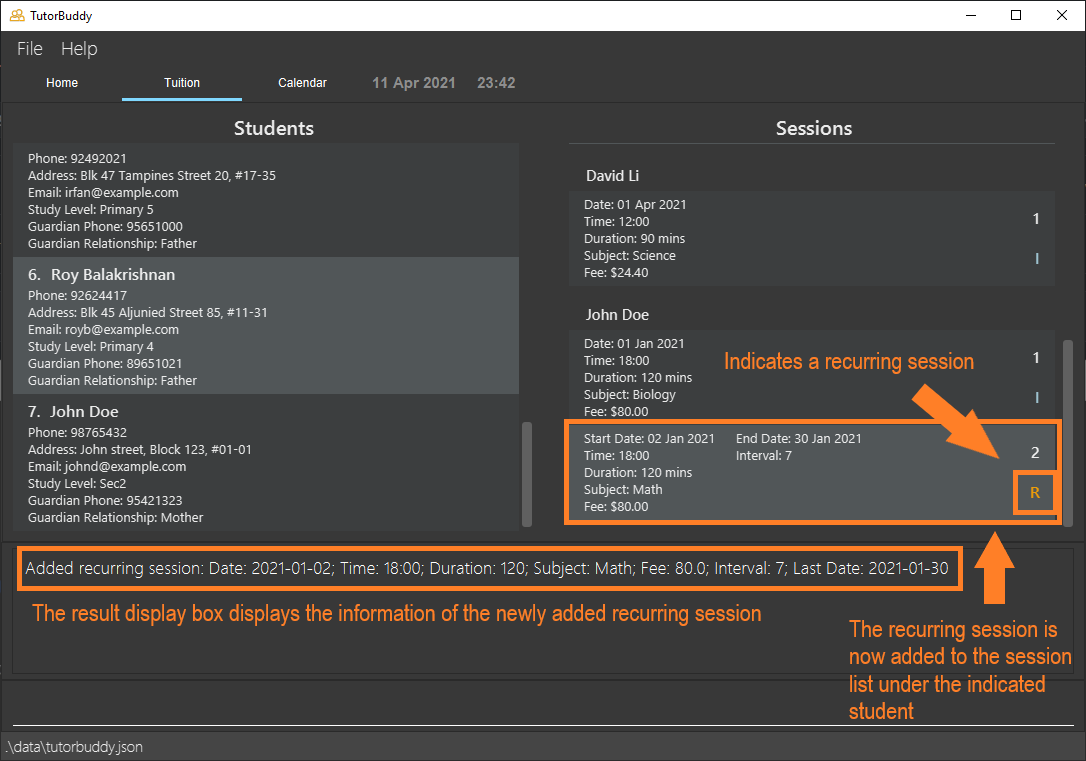
Adding a recurring tuition session: add_rec_session
Adds a recurring tuition session to TutorBuddy that allows you to specify the number of days between each recurring session.
Format: add_rec_session n/STUDENT_NAME d/START_DATE e/END_DATE b/INTERVAL t/TIME k/DURATION s/SUBJECT f/FEE
Arguments similar to add_session command except the following:
-
START_DATEshould be the date of the first session -
END_DATEshould be the date of the last session -
INTERVALis the number of days to the next session
e.g.INTERVAL= 7 for weekly sessions
Example:
- You would like to add a new recurring session for John Doe on the date 02 Jan 2021 at 18:00 where you will teach Math for 120 minutes and charge a fee of $80 for each lesson. The session will occur every 7 days until 29 Jan 2021.
- Type in
add_rec_session n/John Doe d/2021-01-02 e/2021-01-30 b/7 t/18:00 k/120 s/Math f/80and press Enter to add the session information into TutorBuddy.
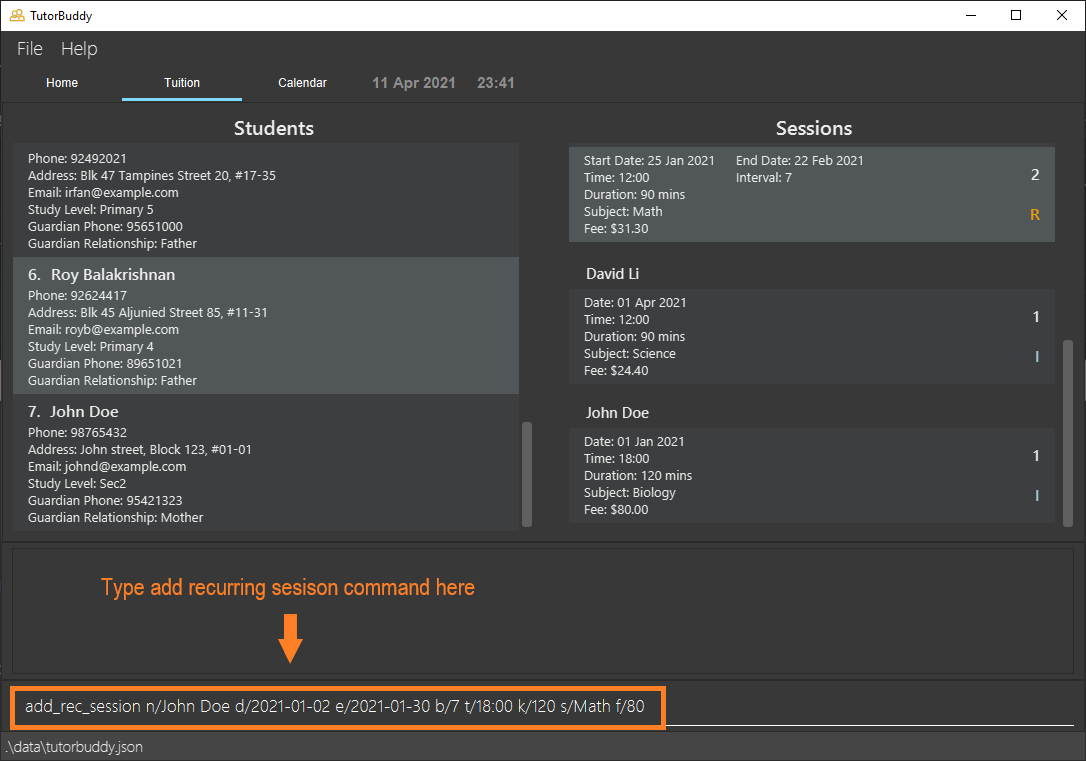
- You will now see that a new recurring session is added in the session list under John Doe and is marked with an orange letter "R" to indicate a recurring session.
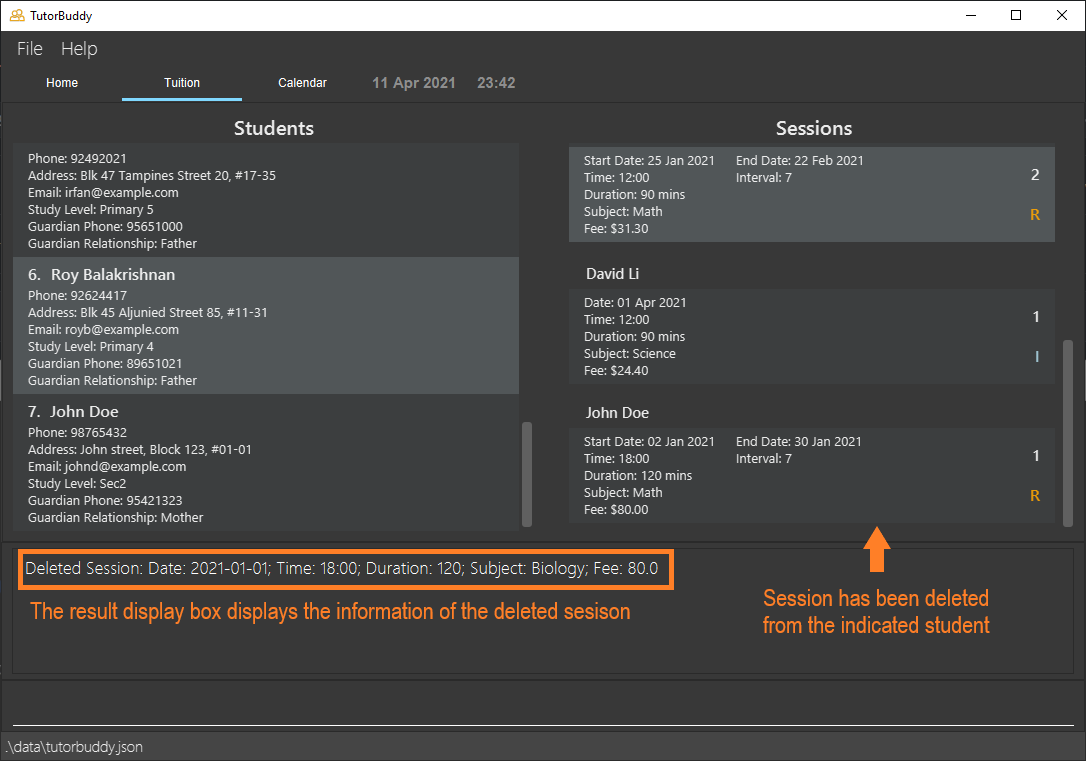
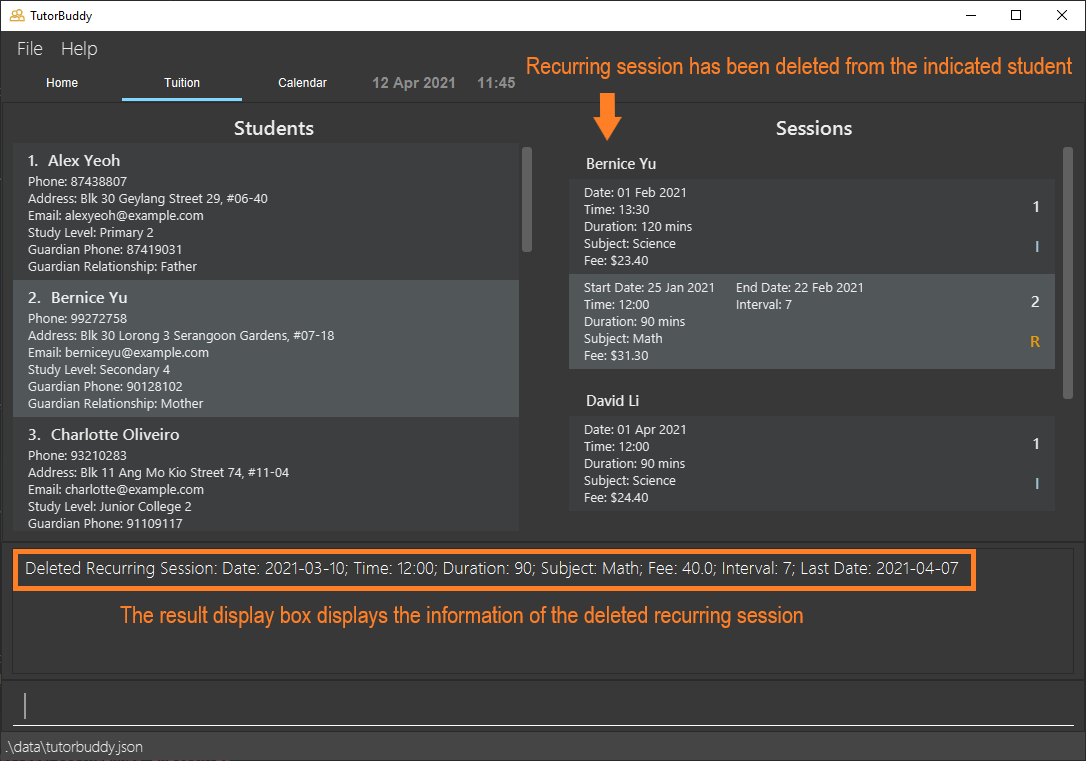
Deleting a tuition session: delete_session
Deletes the specified tuition session (Either an individiual session or the entire recurring session) from TutorBuddy.
Format: delete_session n/STUDENT_NAME i/SESSION_INDEX
-
STUDENT_NAMEshould match the exact student’s name in TutorBuddy -
SESSION_INDEXrefers to the session index for a particular student - Deletes the tuition session at the specified
SESSION_INDEX - The index must be a positive integer 1, 2, 3, …
![]() Note that deleting a student automatically deletes all sessions associated with the student as well.
Note that deleting a student automatically deletes all sessions associated with the student as well.
Example 1:
- You would like to delete an existing session for John Doe on the date 01 Jan 2021 at 18:00.
- Locate the session index to delete on the right of the session card.
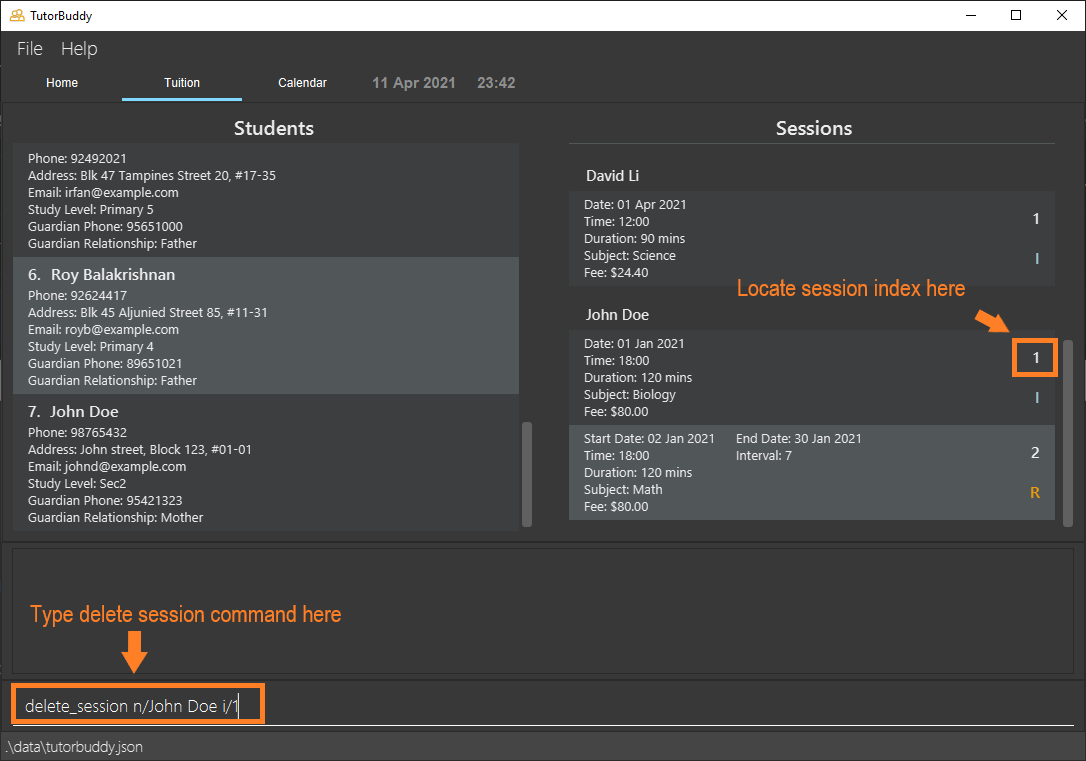
- Using the index from step 2, type in
delete_session n/John Doe i/1and press Enter to deletes John Doe's first session. - You will now see that the session has been deleted.
Example 2:
- You would like to delete an existing recurring session for Alex Yeoh starting on the date 10 Mar 2021 to 07 Apr 2021.
- Locate the session index to delete on the right of the session card.
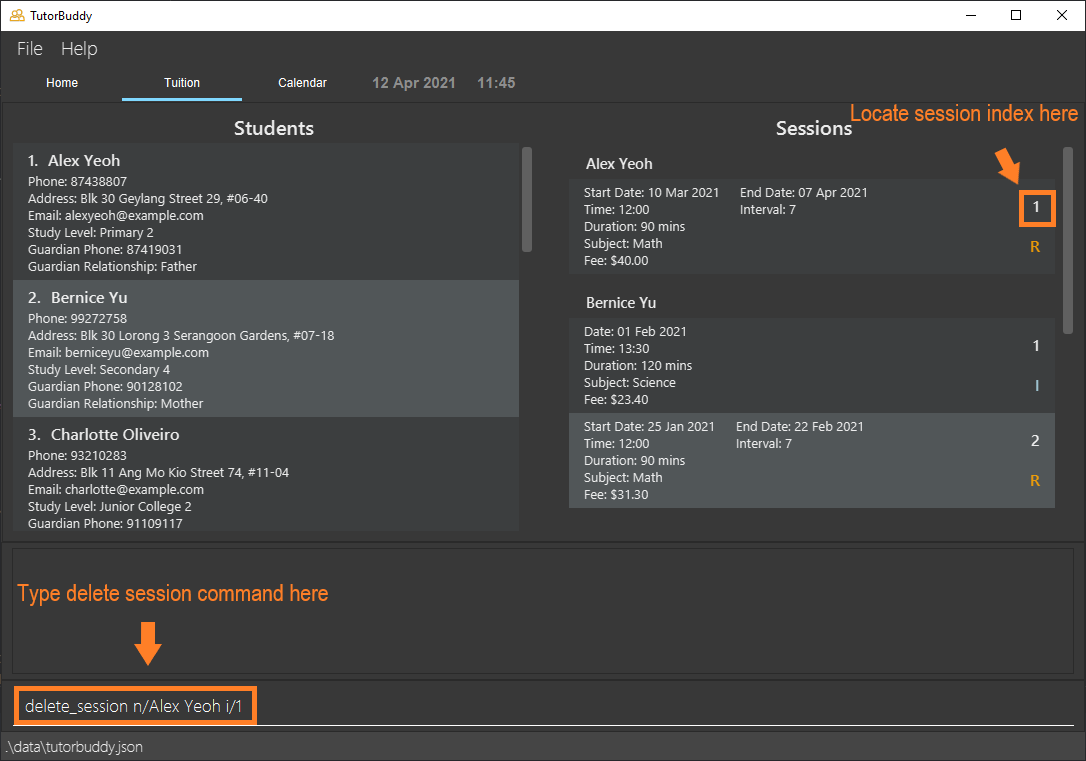
- Using the index from step 2, type in
delete_session n/Alex Yeoh i/1and press Enter to deletes Alex Yeoh's first and only session. - You will now see that the session has been deleted.
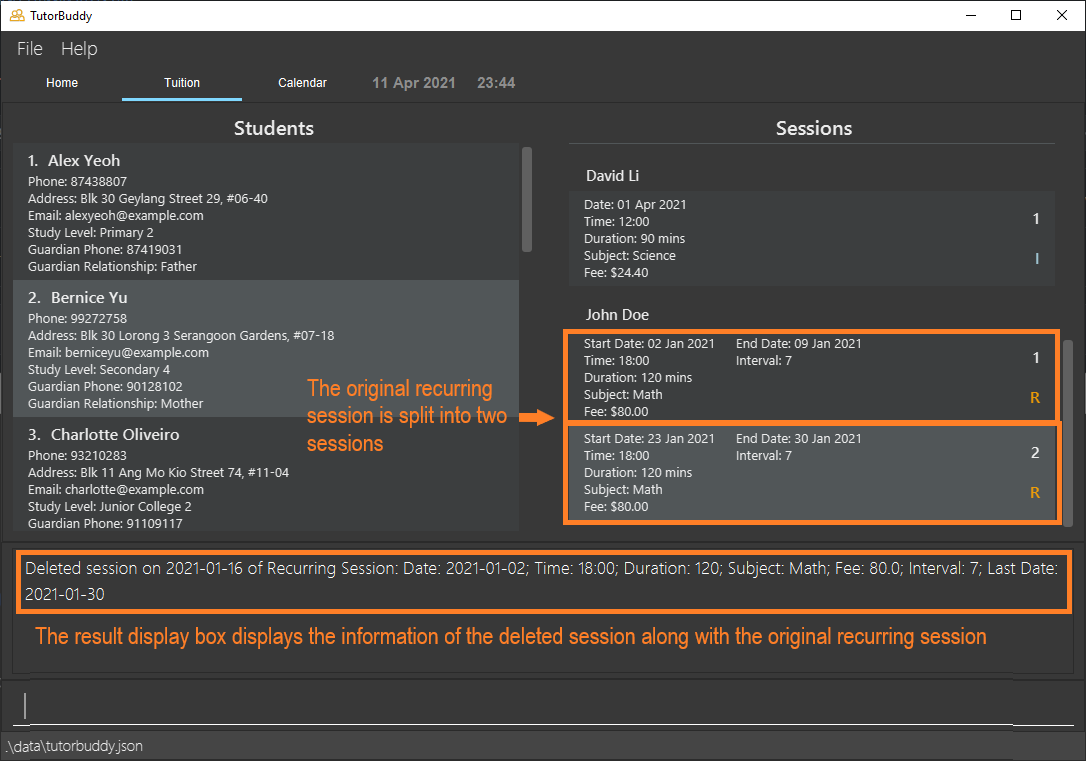
Deleting a recurring tuition session: delete_rec_session
Deletes a single session from an existing recurring tuition session of a specified student from TutorBuddy. Splits the original recurring session into two sessions that span the period exclusively before and after the deleted single session.
Format: delete_rec_session n/STUDENT_NAME i/SESSION_INDEX d/DATE
Arguments similar to delete_session command except the following:
-
DATEshould be the date of the single session to be deleted
![]() Note that the
Note that the DATE should fall under a valid session date that belongs in the specified recurring session range
Example:
- You would like to delete an existing session from a recurring session for John Doe on the date 16 Jan 2021 at 18:00.
- Locate the recurring session index to delete on the right of the session card.
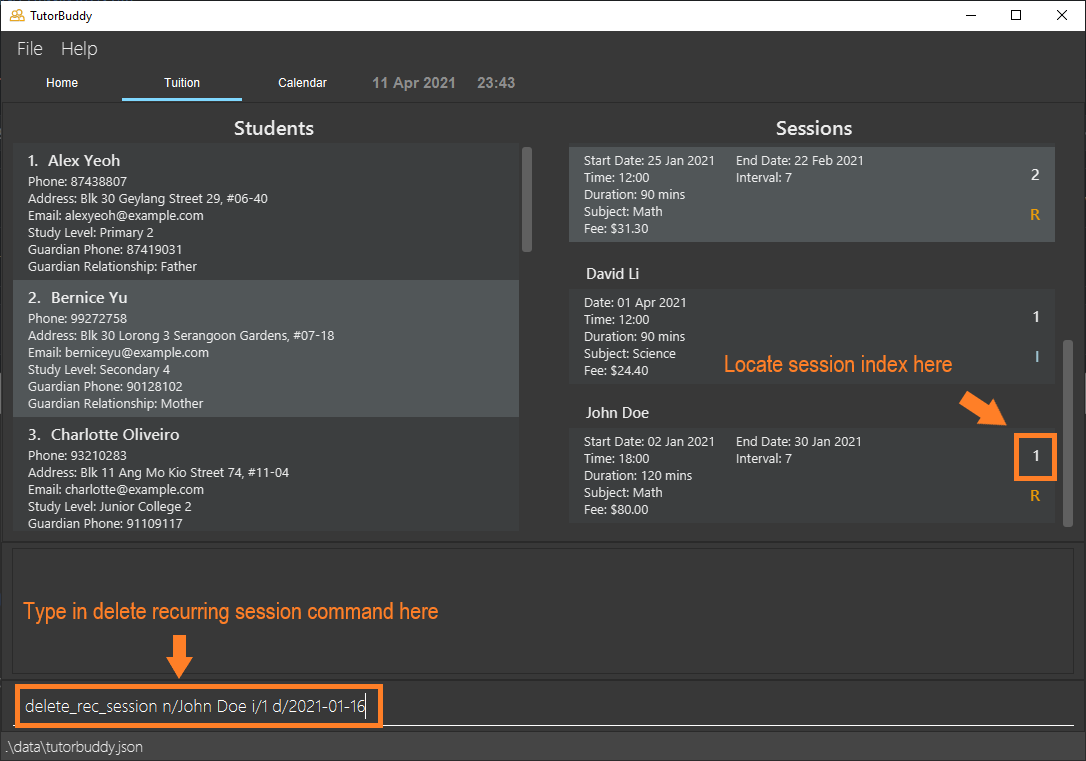
- Using the index from step 2, type in
delete_rec_session n/John Doe i/1 d/2021-01-16and press Enter to delete a single session from John Doe's recurring session. - You will now see that this splits the original recurring session into two recurring session from 02 Jan 2021 to 09 Jan 2021 and another from 23 Jan 2021 to 30 Jan 2021.
4.2.5 Fees
Calculating monthly session fee for a particular student: fee
Calculates and displays the total monthly session fee for a particular student for a particular month and year.
Format: fee n/STUDENT_NAME m/MONTH y/YEAR
-
STUDENT_NAMEshould match the exact student’s name in TutorBuddy -
MONTHshould be a positive integer between 1 and 12 inclusive -
YEARshould be a positive integer between 1970 and 2037 inclusive
Example:
- You want to get the monthly fee payable by Alex Yeoh for March 2021.
- Type
fee n/Alex Yeoh m/3 y/2021and press Enter.
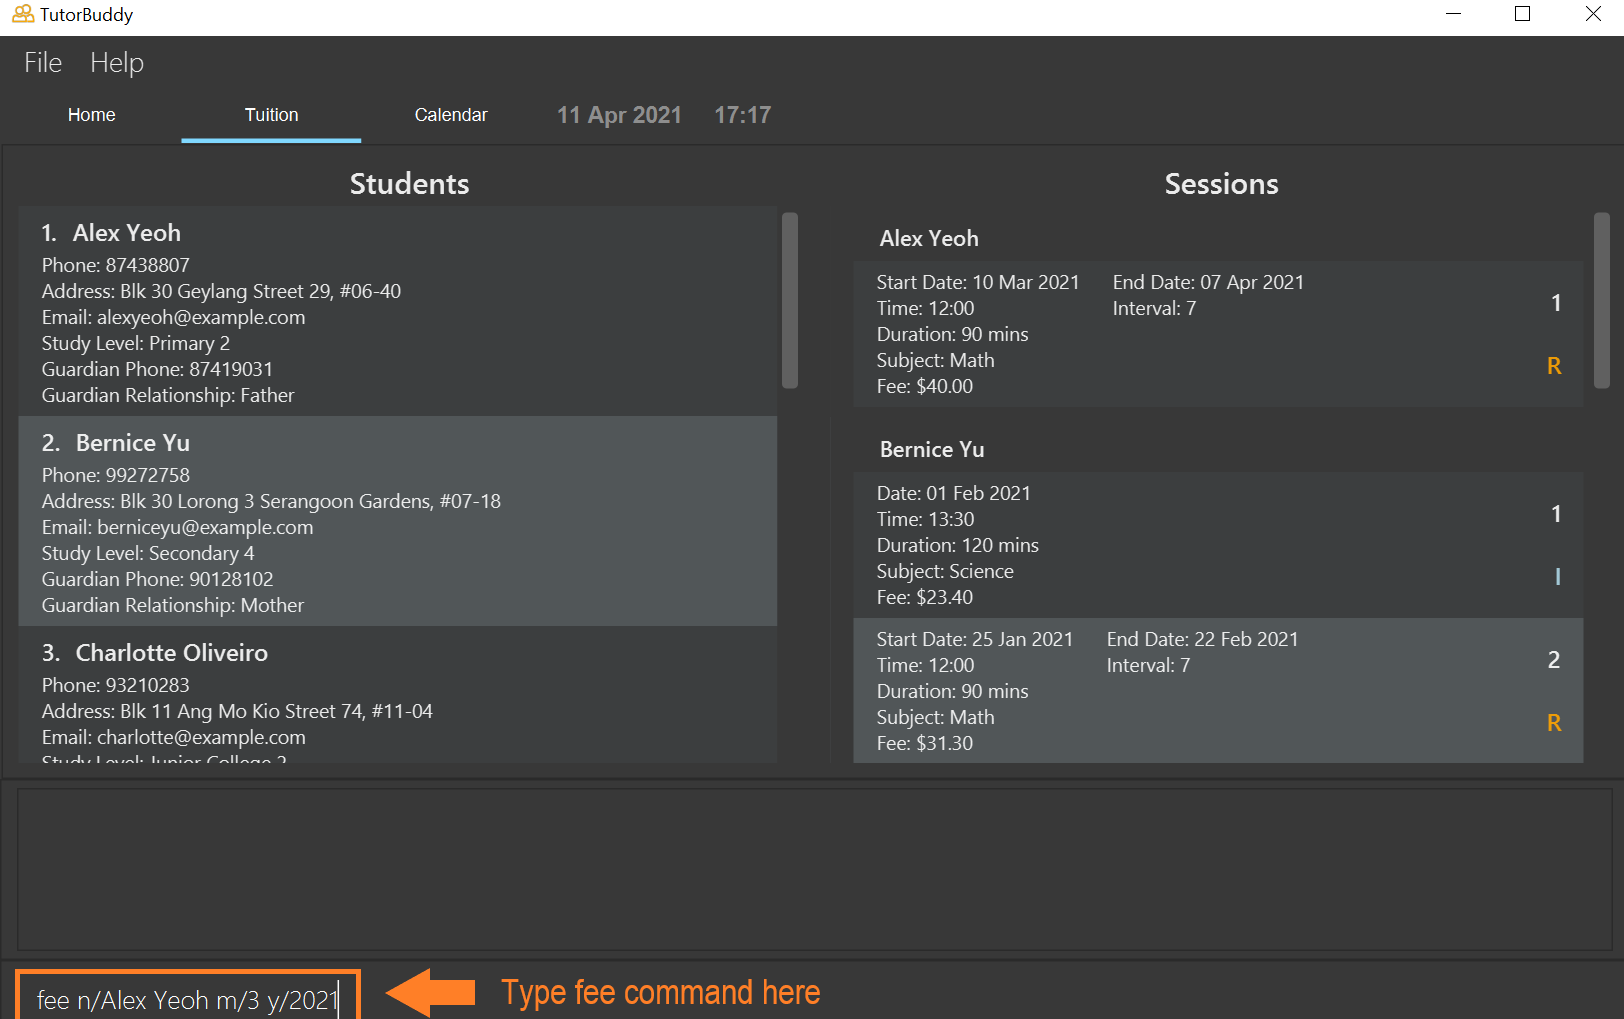
- The result display box displays Alex Yeoh's monthly fee for March 2021.

![]() Note that calculation of fee is only guaranteed to be accurate for totaled fees of up to $2,147,483,647.
We do not expect a person to earn more than $2,147,483,647 a month, hence the fee calculation should be accurate for all actual users.
Note that calculation of fee is only guaranteed to be accurate for totaled fees of up to $2,147,483,647.
We do not expect a person to earn more than $2,147,483,647 a month, hence the fee calculation should be accurate for all actual users.
5. Command summary
General
| Action | Format |
|---|---|
| Help | help |
| List all students and sessions | list |
| Clear all students and sessions | clear |
| Exit TutorBuddy | exit |
Students
| Action | Format | Examples (if applicable) |
|---|---|---|
| Add | add_student n/NAME p/STUDENT_PHONE_NUMBER e/EMAIL a/ADDRESS l/STUDY_LEVEL g/GUARDIAN_PHONE_NUMBER r/RELATIONSHIP_WITH_GUARDIAN |
add_student n/John Doe p/98765432 e/johnd@example.com a/John street, Block 123, #01-01 l/Sec2 g/95421323 r/Mother |
| Find | find_student KEYWORD [MORE_KEYWORDS] |
find_student John Alex |
| Edit | edit_student STUDENT_INDEX [n/NAME] [p/STUDENT_PHONE_NUMBER] [e/EMAIL] [a/ADDRESS] [l/STUDY_LEVEL] [g/GUARDIAN_PHONE_NUMBER] [r/RELATIONSHIP_WITH_GUARDIAN] |
edit_student 1 p/98825432 e/alexy@example.com a/Alex street, Block 123, #01-01 |
| Delete | delete_student STUDENT_INDEX |
delete_student 3 |
| List students’ emails based on current list | emails |
Tuition Sessions
| Action | Format | Examples |
|---|---|---|
| Add Single Session | add_session n/STUDENT_NAME d/DATE t/TIME k/DURATION s/SUBJECT f/FEE |
add_session n/John Doe d/2021-01-01 t/18:00 k/120 s/Biology f/80 |
| Add Recurring Session | add_rec_session n/STUDENT_NAME d/DATE e/LASTDATE b/INTERVAL t/TIME k/DURATION s/SUBJECT f/FEE |
add_rec_session n/John Doe d/2021-01-02 e/2021-01-30 b/7 t/18:00 k/120 s/Math f/80 |
| Delete Session | delete_session n/STUDENT_NAME i/SESSION_INDEX |
delete_session n/John Doe i/1 |
| Delete Recurring Session | delete_rec_session n/STUDENT_NAME i/SESSION_INDEX d/DATE |
delete_rec_session n/John Doe i/1 d/2021-01-16 |
Fees
| Action | Format | Examples |
|---|---|---|
| Check fee | fee n/STUDENT_NAME m/MONTH y/YEAR |
fee n/John Doe m/1 y/2021 |
6. FAQ
Q: How do I transfer my data to another Computer?
A: Install the app in the other computer and overwrite the empty data file it creates with the file that contains the data of your previous TutorBuddy home folder.
Q: May I edit the data file?
A: Advanced users are welcome to update data directly by editing that data file. Tutorbuddy data are saved as a JSON file [JAR file location]/data/tutorbuddy.json.
![]() Caution:
If your changes to the data file makes its format invalid, TutorBuddy may not function as intended.
Caution:
If your changes to the data file makes its format invalid, TutorBuddy may not function as intended.
7. Glossary
This glossary provides definitions for the special terms used in this user guide.
Single Session: One time session on a particular date.
Recurring Session: Repeating session that occurs every number of days.
URL: An address of a web page. e.g. https://www.google.com/
8. Appendix
Sample Data
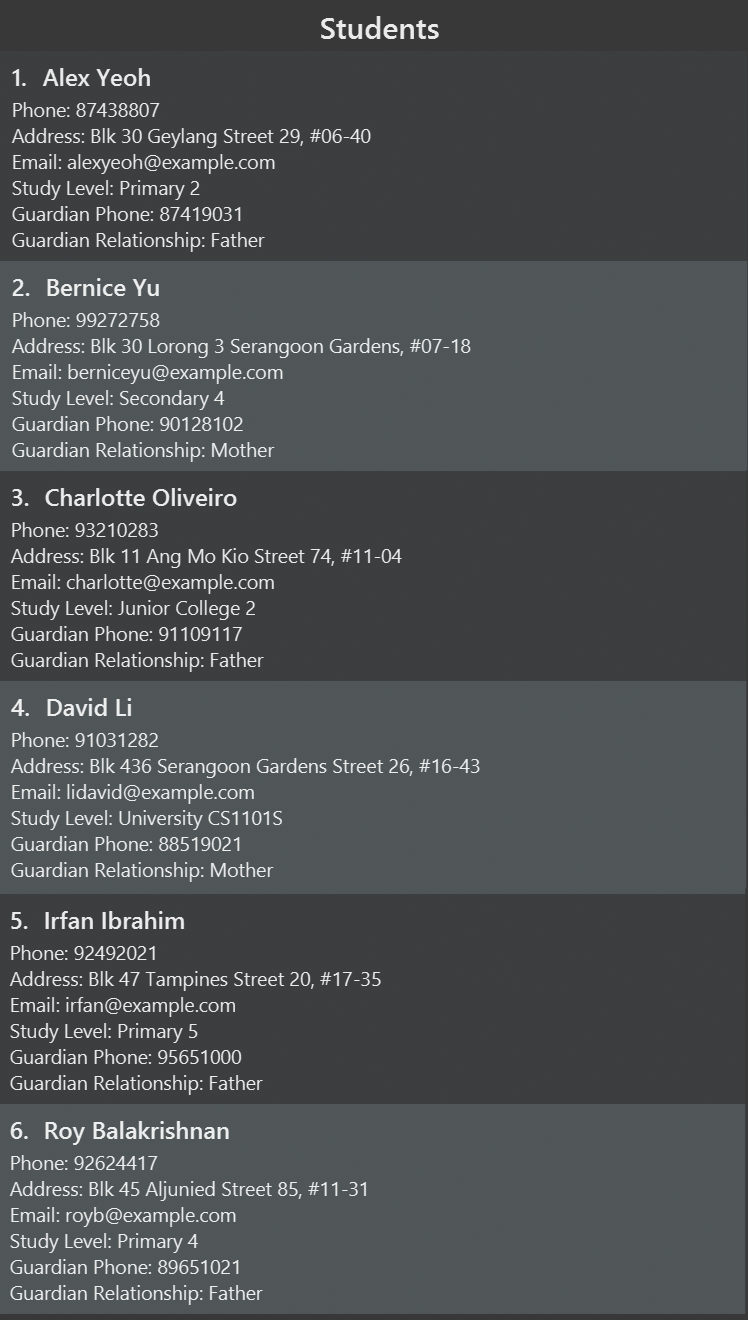
Sample Data (Students)
Sample Data (Sessions)